Creating Workflows
Build AI-powered workflows using the visual drag-and-drop builder.
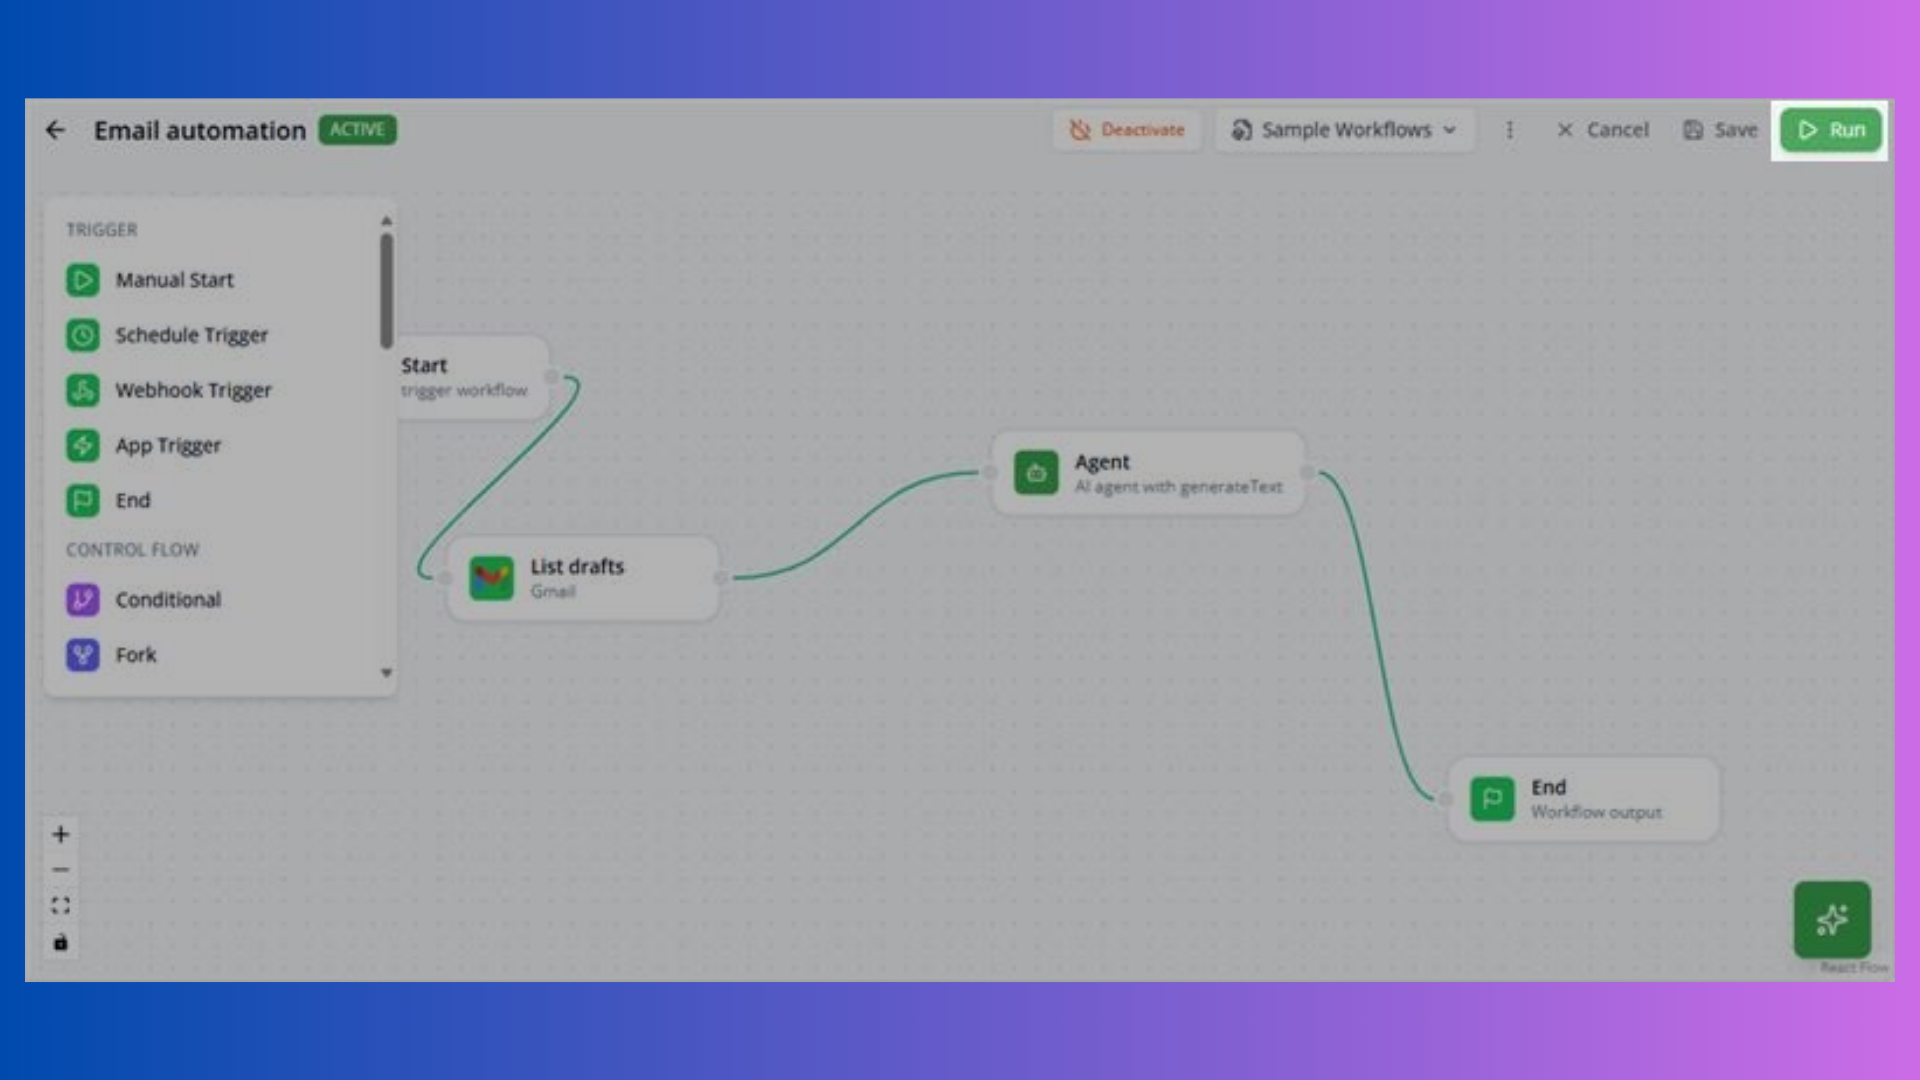
Workflow Builder
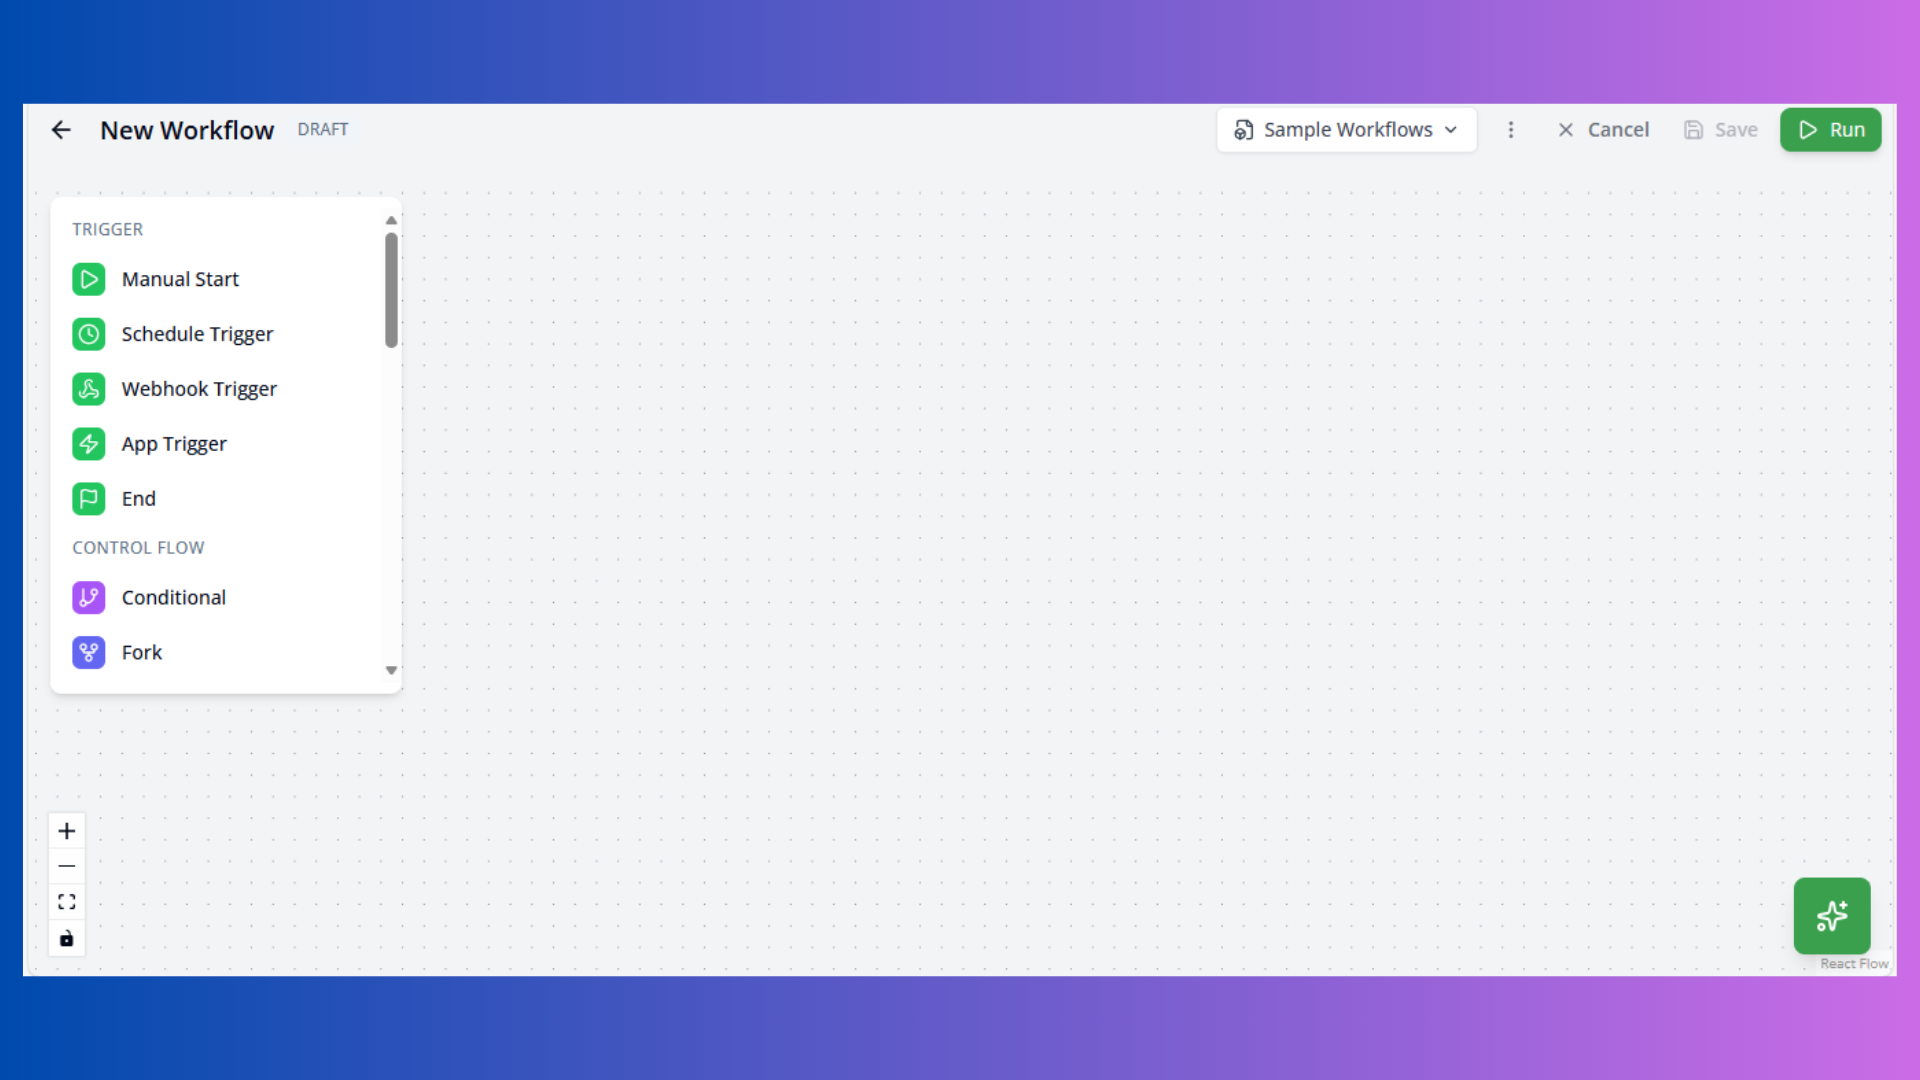
The visual workflow builder provides a canvas for creating complex automations by connecting nodes. Each node represents an action, trigger, or control flow operation.
Builder Components:
- Node Palette: Left sidebar with available nodes (collapsible)
- Canvas: Drag-and-drop workspace with zoom/pan controls
- Config Panel: Right sidebar for node configuration
- Execution Panel: Bottom panel for testing and debugging
- AI Chat: AI assistant for workflow generation and help
Building Your First Workflow
Basic Workflow Structure
Every workflow needs:
- Trigger Node: Start point (Start, Schedule, Webhook, or App trigger)
- Action Nodes: Processing steps (AI agents, tools, API calls)
- End Node: Termination point (optional but recommended)
Creating a Workflow
- Click Create Workflow from workflows list
- Drag nodes from palette to canvas
- Connect nodes by dragging from output handle to input handle
- Configure each node by clicking it
- Click Save to store workflow
- Click Run to test execution


Trigger Nodes
Trigger nodes initiate workflow execution.
Start Node
 Purpose: Manual trigger for on-demand execution
Configuration: No configuration required
Use Cases:
- Ad-hoc workflows
- Testing and debugging
- Manual data processing
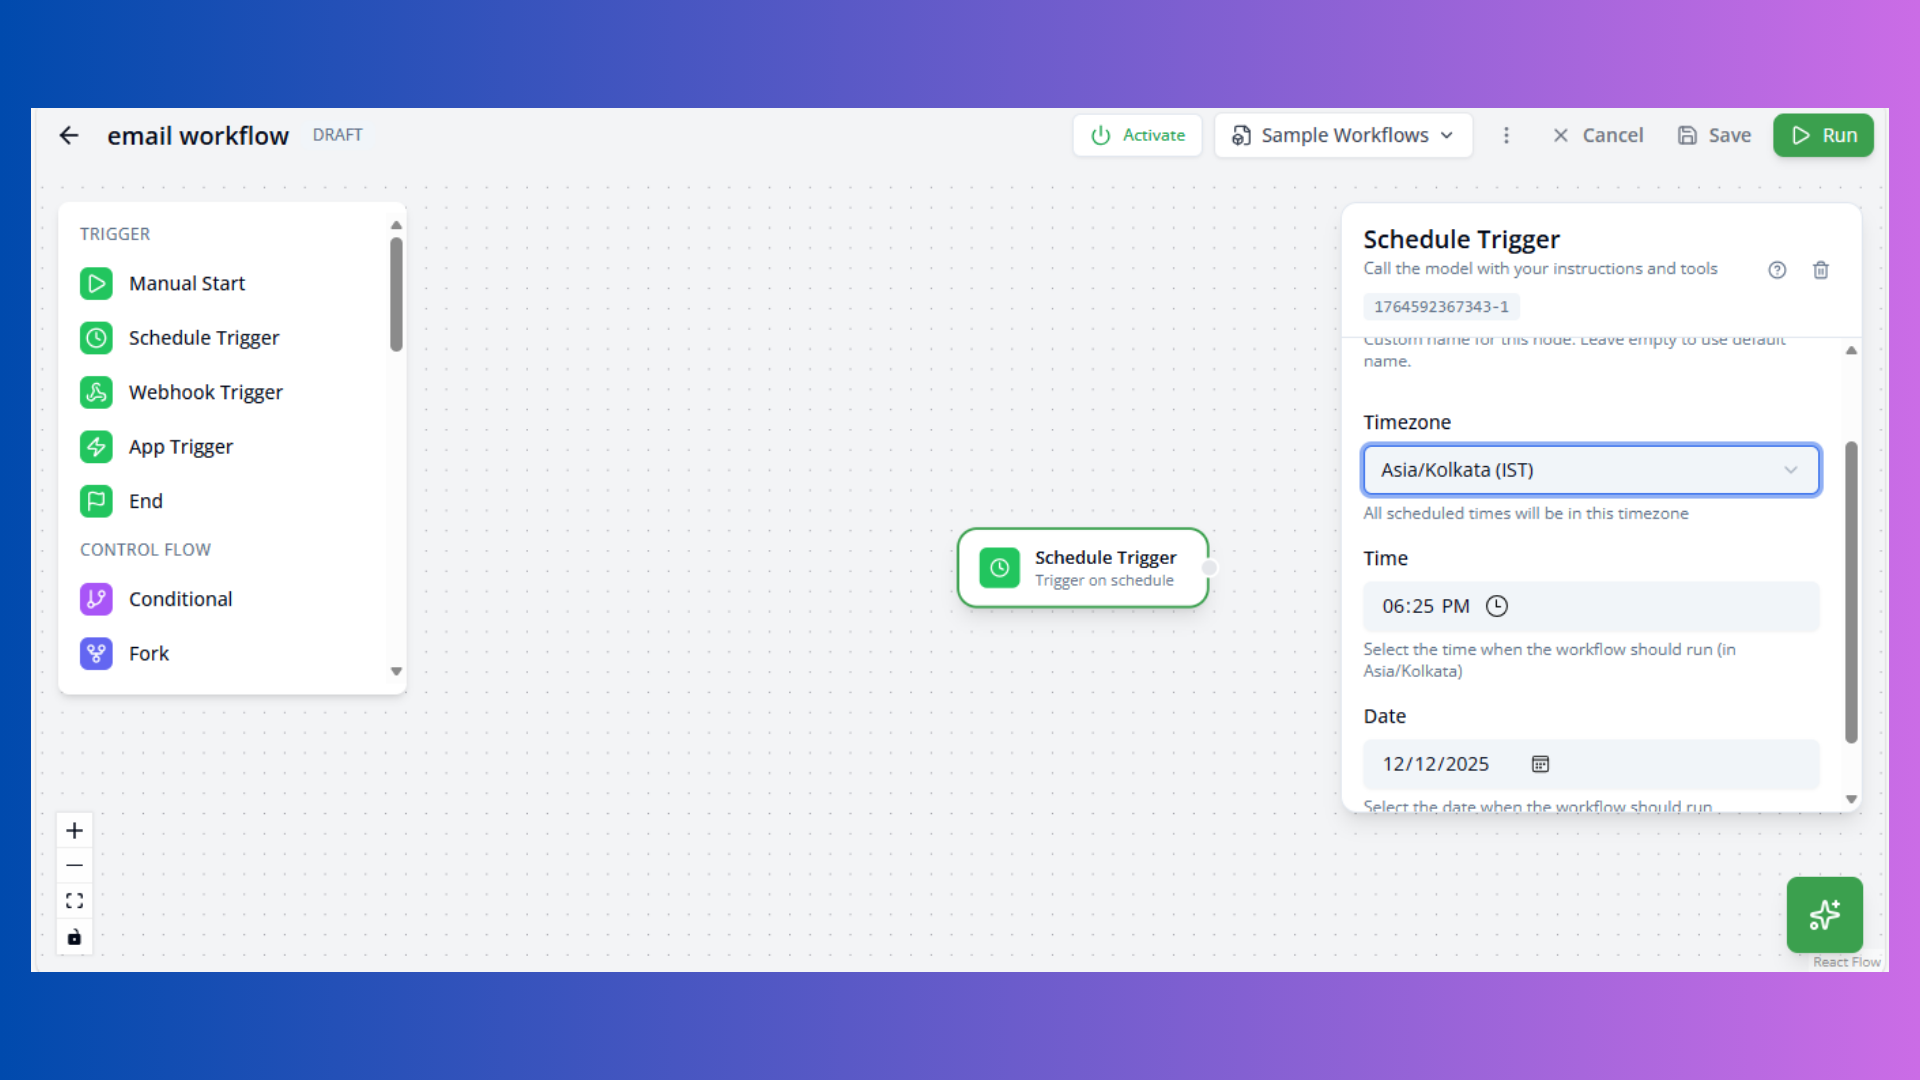
Schedule Trigger
Purpose: Time-based workflow execution
Configuration:
- Cron Expression: Schedule pattern (e.g.,
0 9 * * *for daily at 9 AM) - Timezone: Execution timezone (default: UTC)
- Enabled: Toggle trigger on/off
Common Patterns:
0 9 * * *- Daily at 9 AM0 9 * * 1- Every Monday at 9 AM0 */6 * * *- Every 6 hours0 0 1 * *- First day of each month
Use Cases:
- Daily reports
- Scheduled data sync
- Recurring notifications
Webhook Trigger
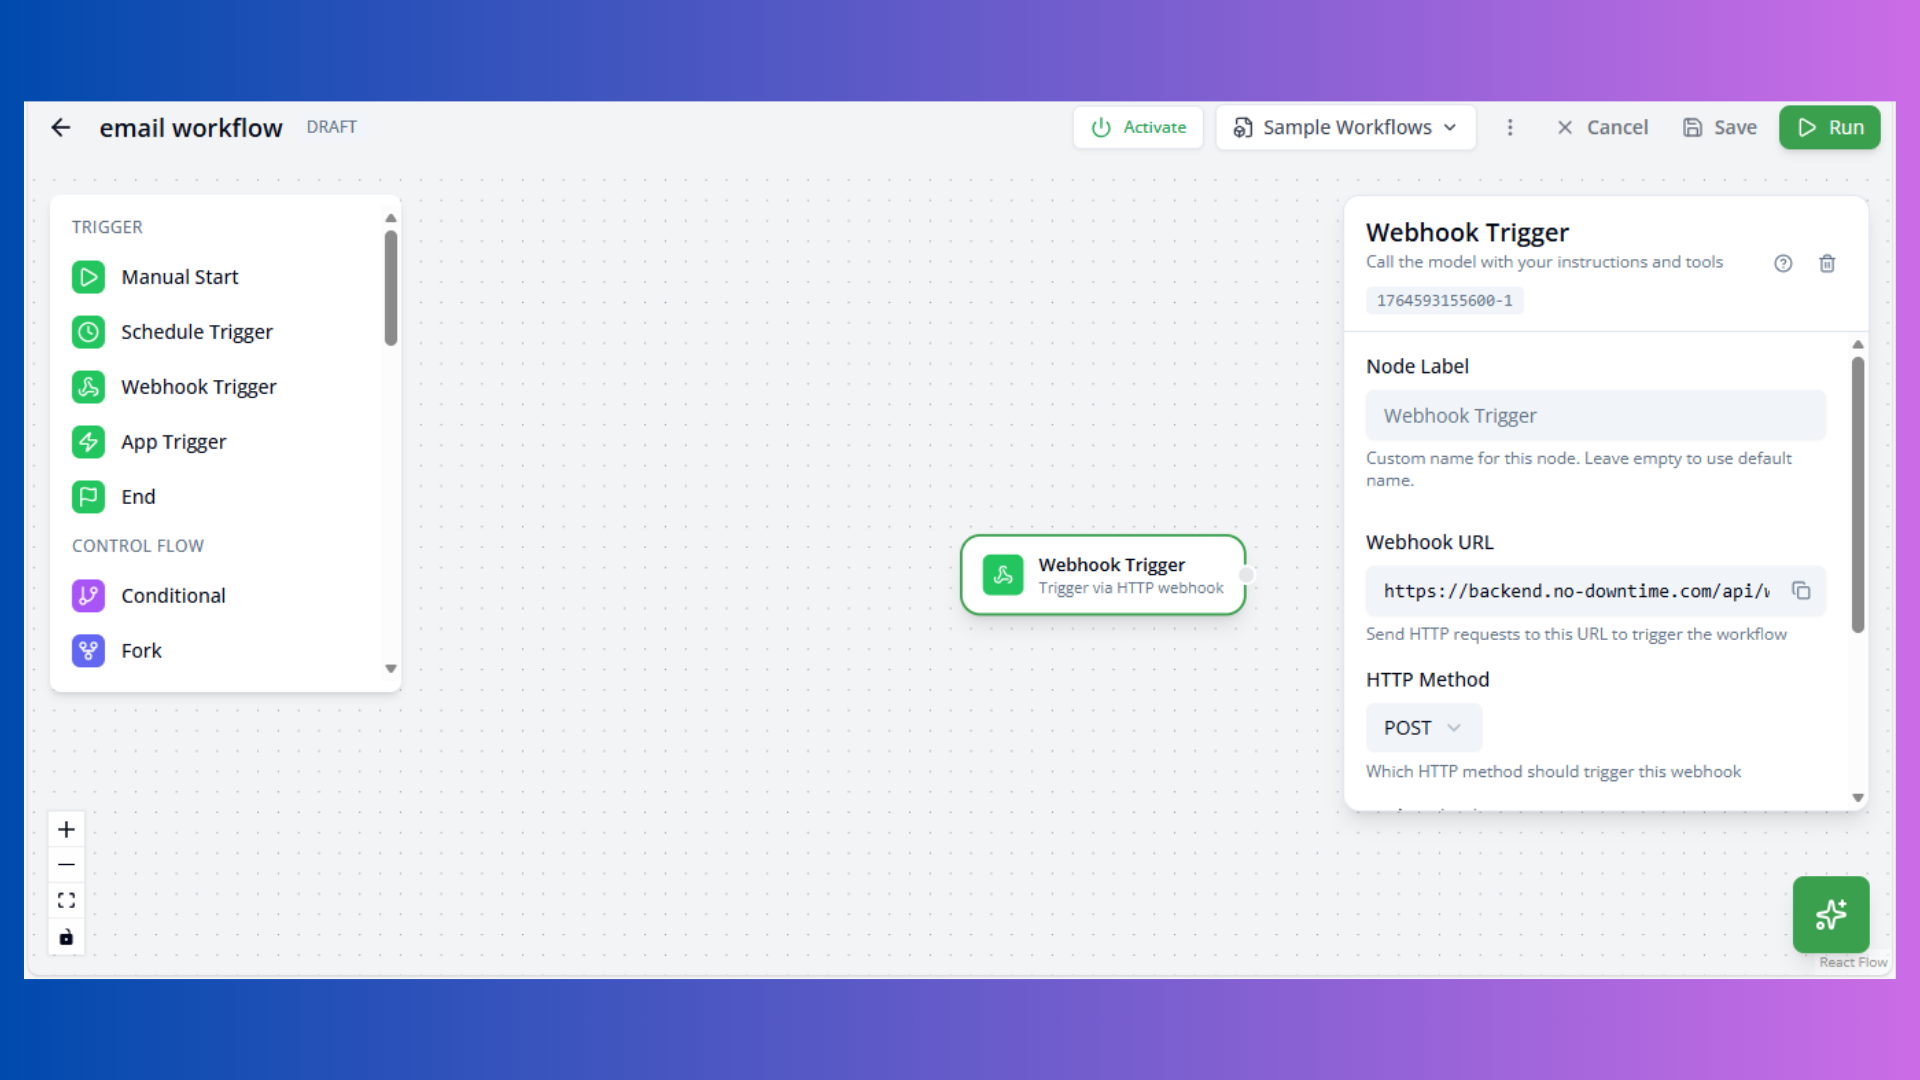
Purpose: HTTP webhook-based execution
Configuration:
- Webhook URL: Auto-generated endpoint
- Method: HTTP method (POST, GET, PUT, DELETE)
- Authentication: API key or none
Use Cases:
- External system integration
- Event-driven workflows
- Third-party notifications
Accessing Webhook Data:
Use input1 or trigger.body in downstream nodes to access webhook payload.
App Trigger
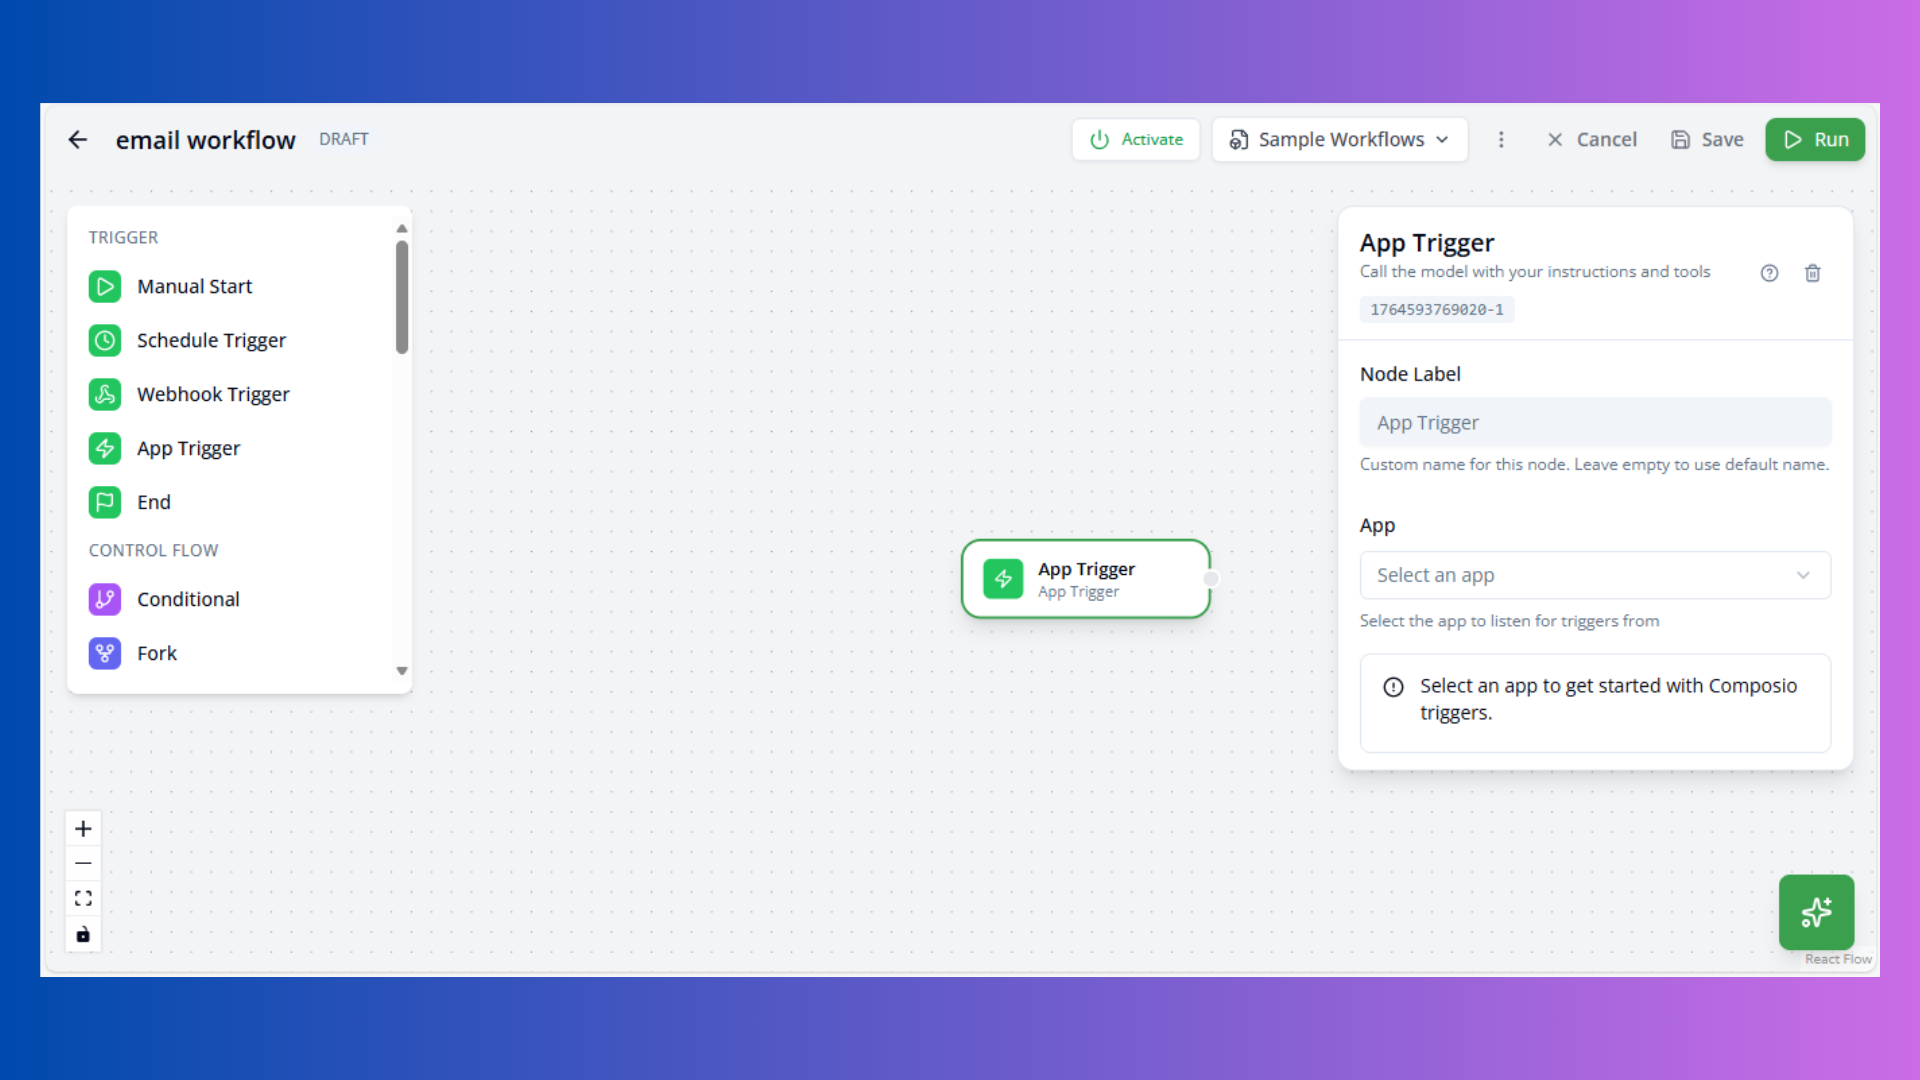
Purpose: Application event-based execution
Configuration:
- App: Select integrated application
- Trigger: Choose specific event
- Parameters: Event-specific settings
Use Cases:
- CRM updates
- Form submissions
- Database changes
AI & Model Nodes
AI-powered processing nodes for intelligent workflows.
Agent Node
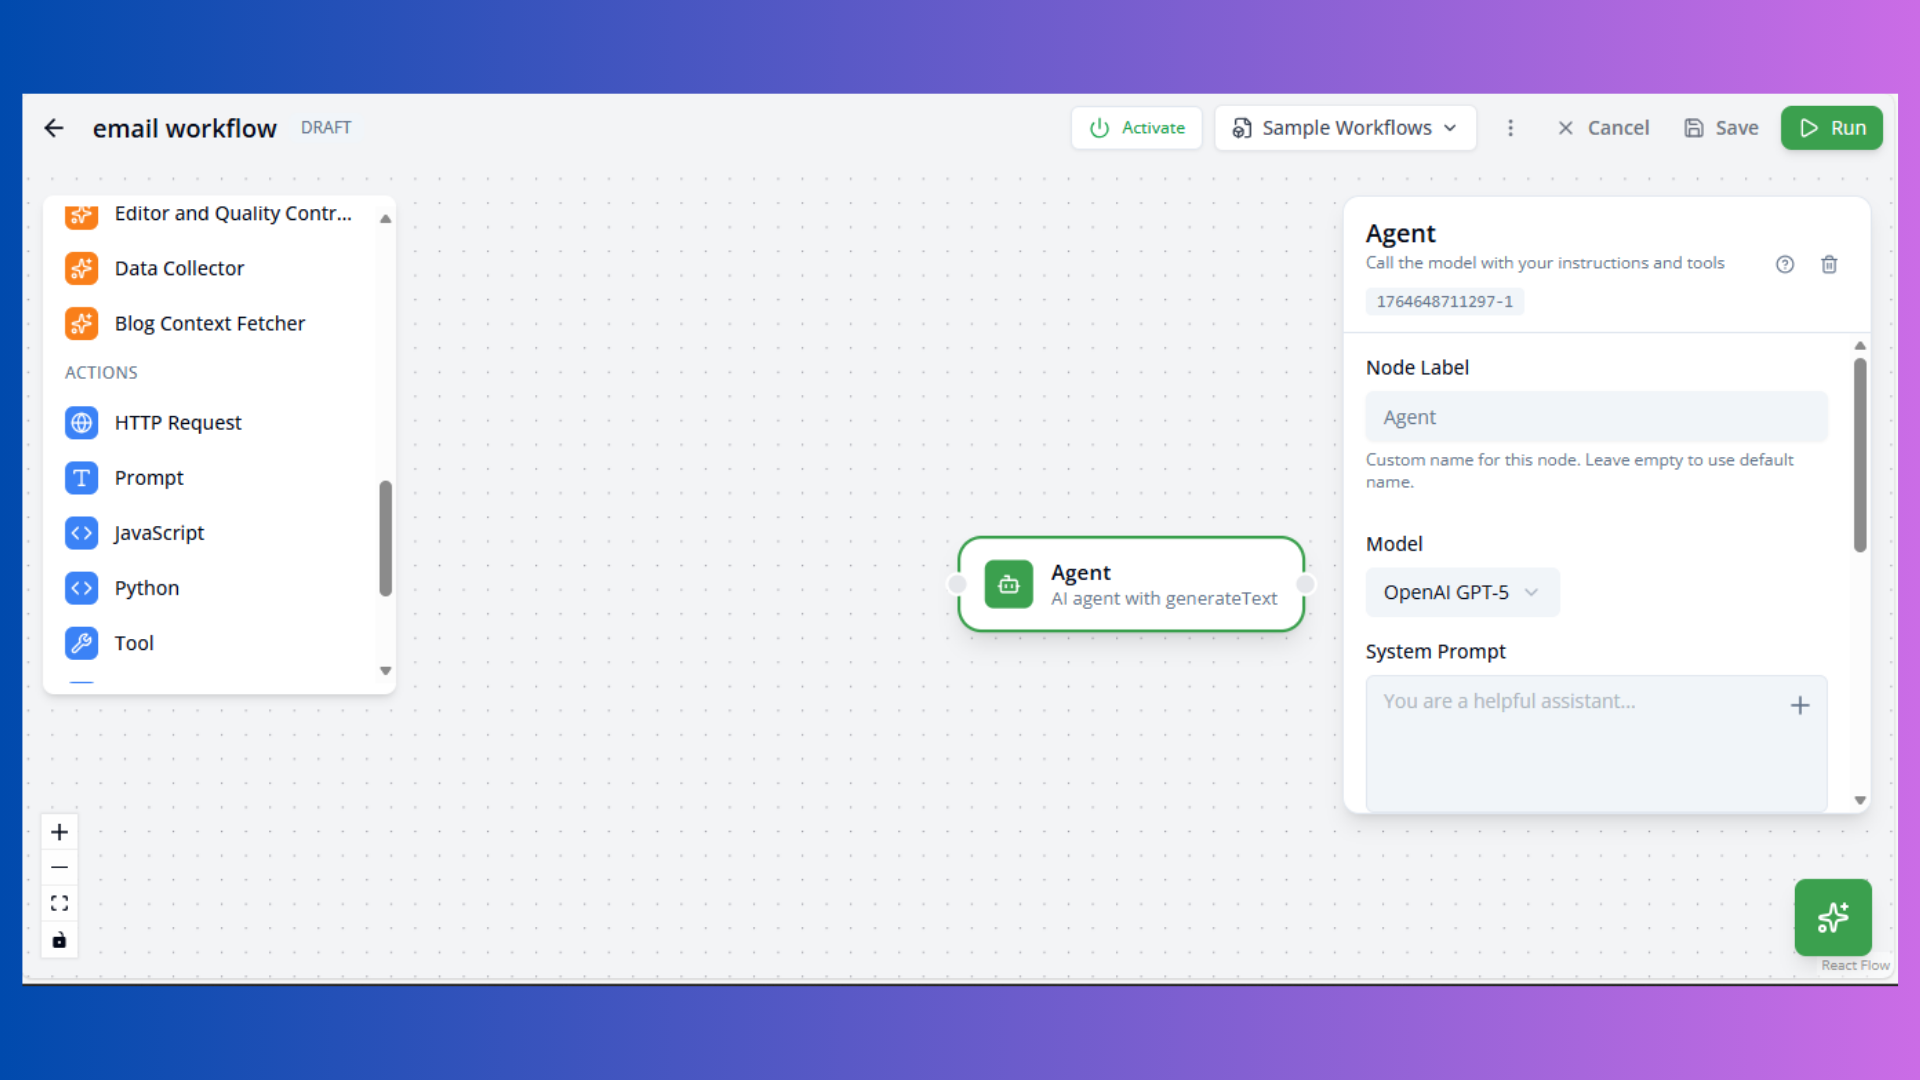
Purpose: AI agent with tool-calling capabilities
Configuration:
- Model: AI model (e.g.,
openai/gpt-5) - Temperature: Creativity (0-1, default: 0.7)
- Max Tokens: Response length limit (default: 2000)
- System Prompt: Agent instructions
- Max Steps: Maximum tool calls (default: 5)
Use Cases:
- Complex reasoning tasks
- Multi-step problem solving
- Tool orchestration
Accessing Inputs:
Reference previous node outputs using input1, input2, etc.
Prompt Node
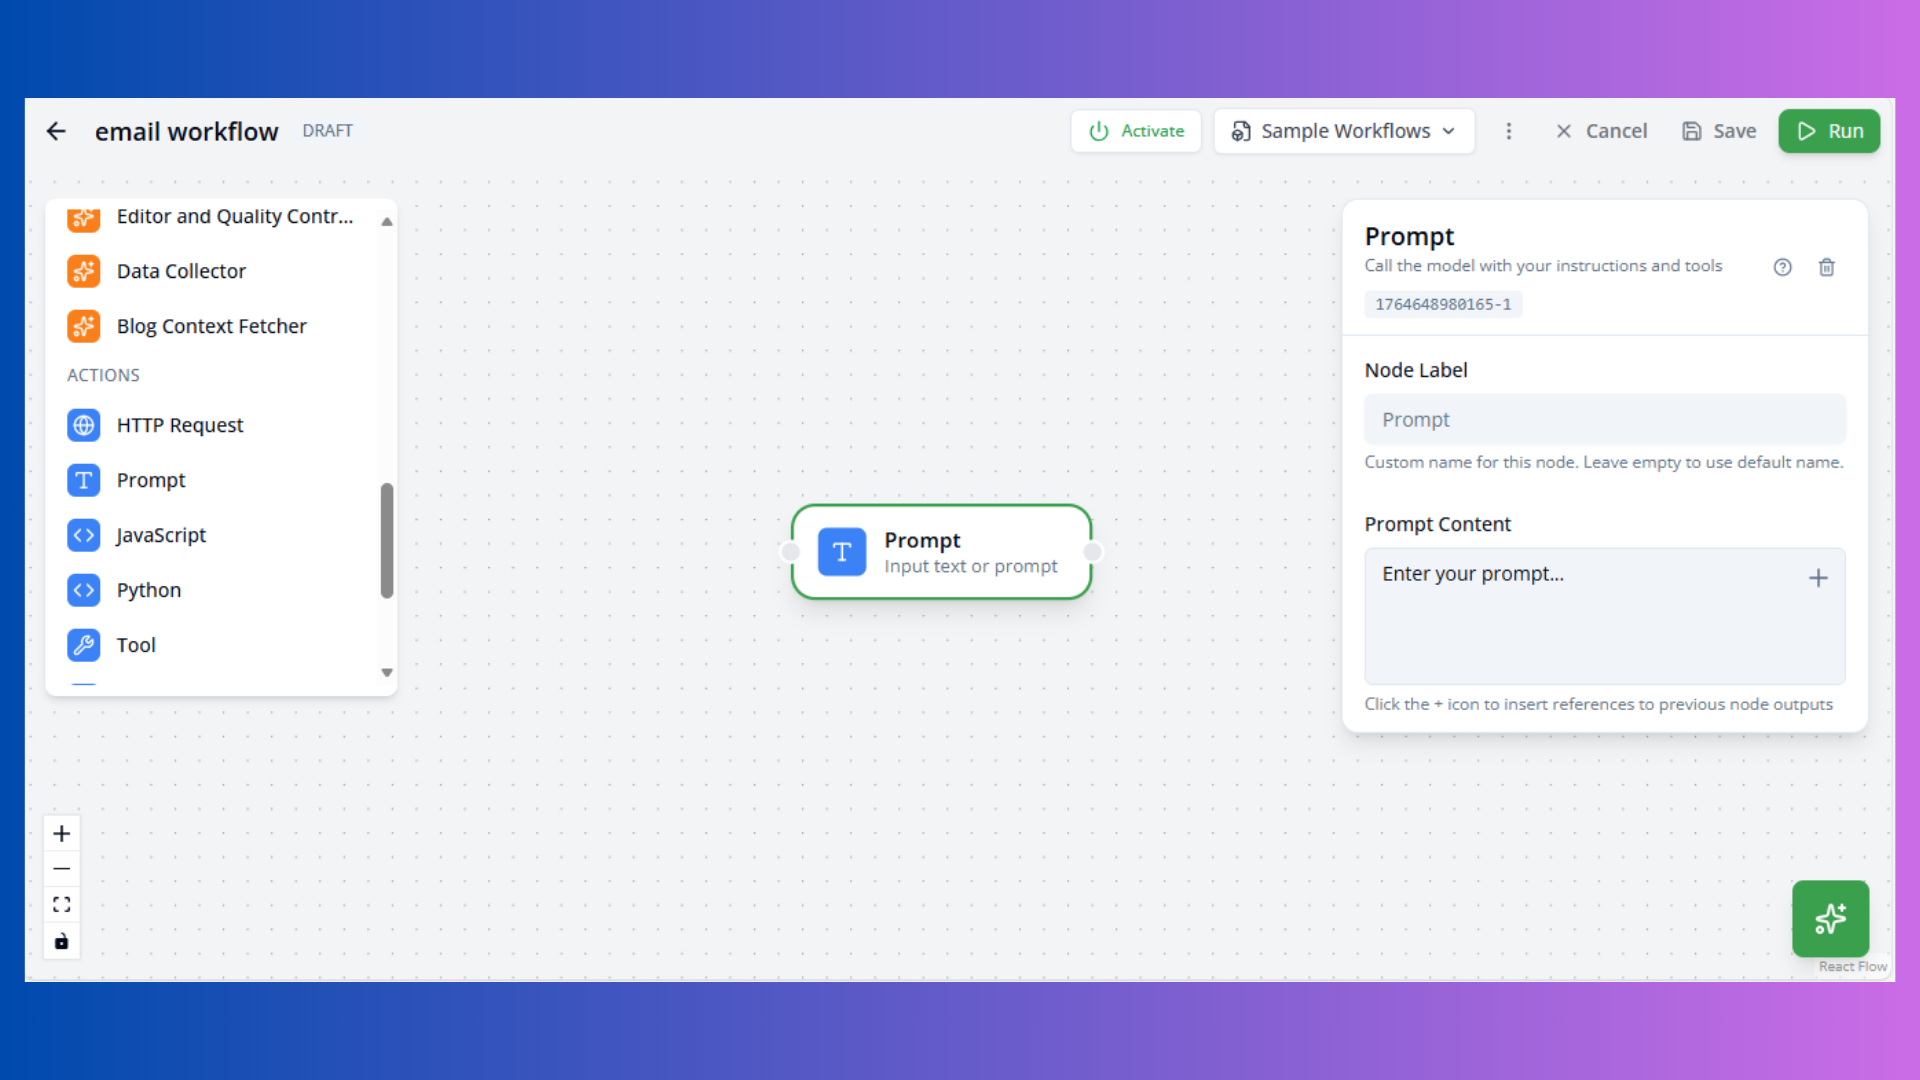
Purpose: Simple text generation without tools
Configuration:
- Content: Prompt template
Template Variables:
{input1},{input2}: Previous node outputs{variable_name}: Custom variables
Use Cases:
- Content generation
- Text transformation
- Summarization
Embedding Model Node
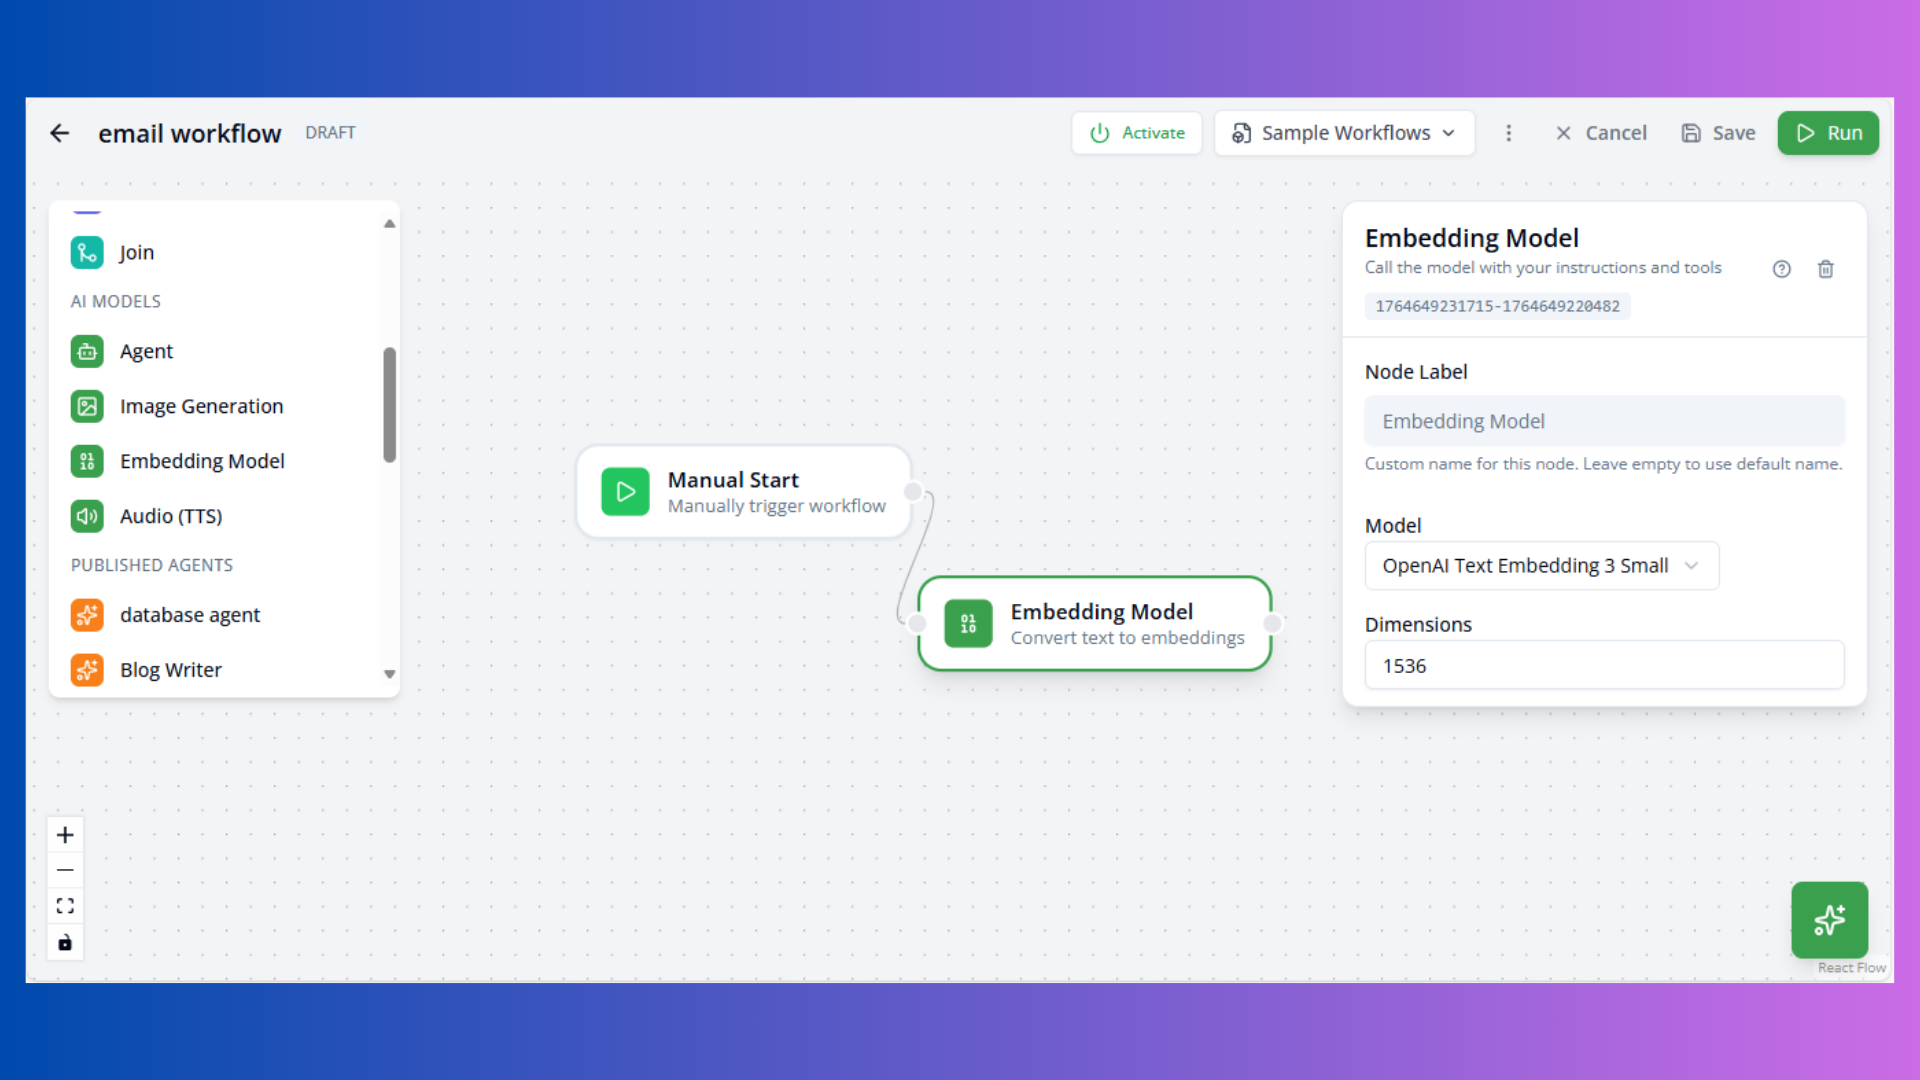 Purpose: Convert text to vector embeddings
Configuration:
- Model: Embedding model (e.g.,
openai/text-embedding-3-small) - Dimensions: Vector size (default: 1536)
Use Cases:
- Semantic search
- Document clustering
- Similarity matching
Structured Output Node
 Purpose: Extract structured data from AI responses
Configuration:
- Schema Name: Output schema identifier
- Mode: object or array
Use Cases:
- Data extraction
- Form filling
- Structured data generation
Image Generation Node

Purpose: Generate images from text prompts
Configuration:
- Model: Image model (e.g.,
gemini-2.5-flash-image) - Aspect Ratio: Image dimensions (1:1, 16:9, 9:16)
- Output Format: png or jpeg
Use Cases:
- Marketing content
- Visual assets
- Creative generation
Audio Node
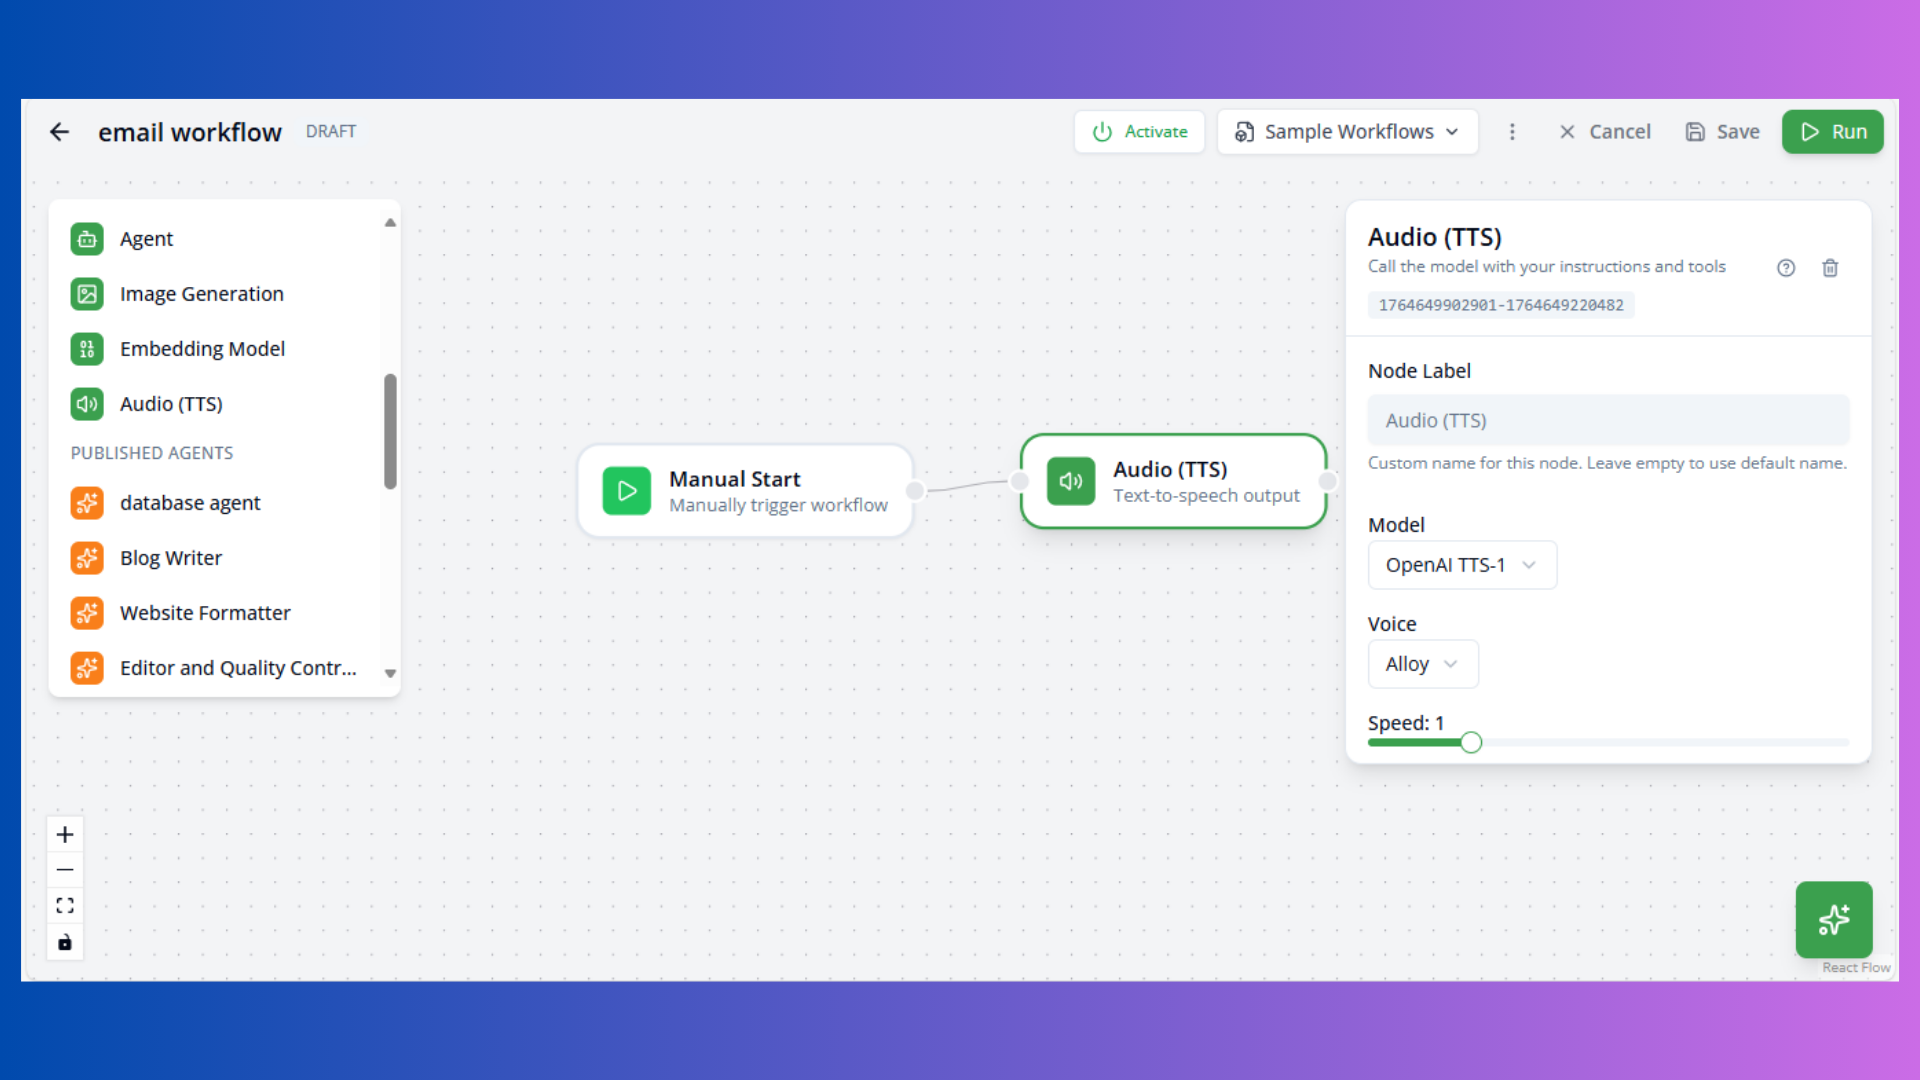
Purpose: Text-to-speech conversion
Configuration:
- Model: TTS model (e.g.,
openai/tts-1) - Voice: Voice selection (alloy, echo, fable, onyx, nova, shimmer)
- Speed: Playback speed (0.25-4.0, default: 1.0)
Use Cases:
- Voice notifications
- Content accessibility
- Audio content generation
Published Agent Node
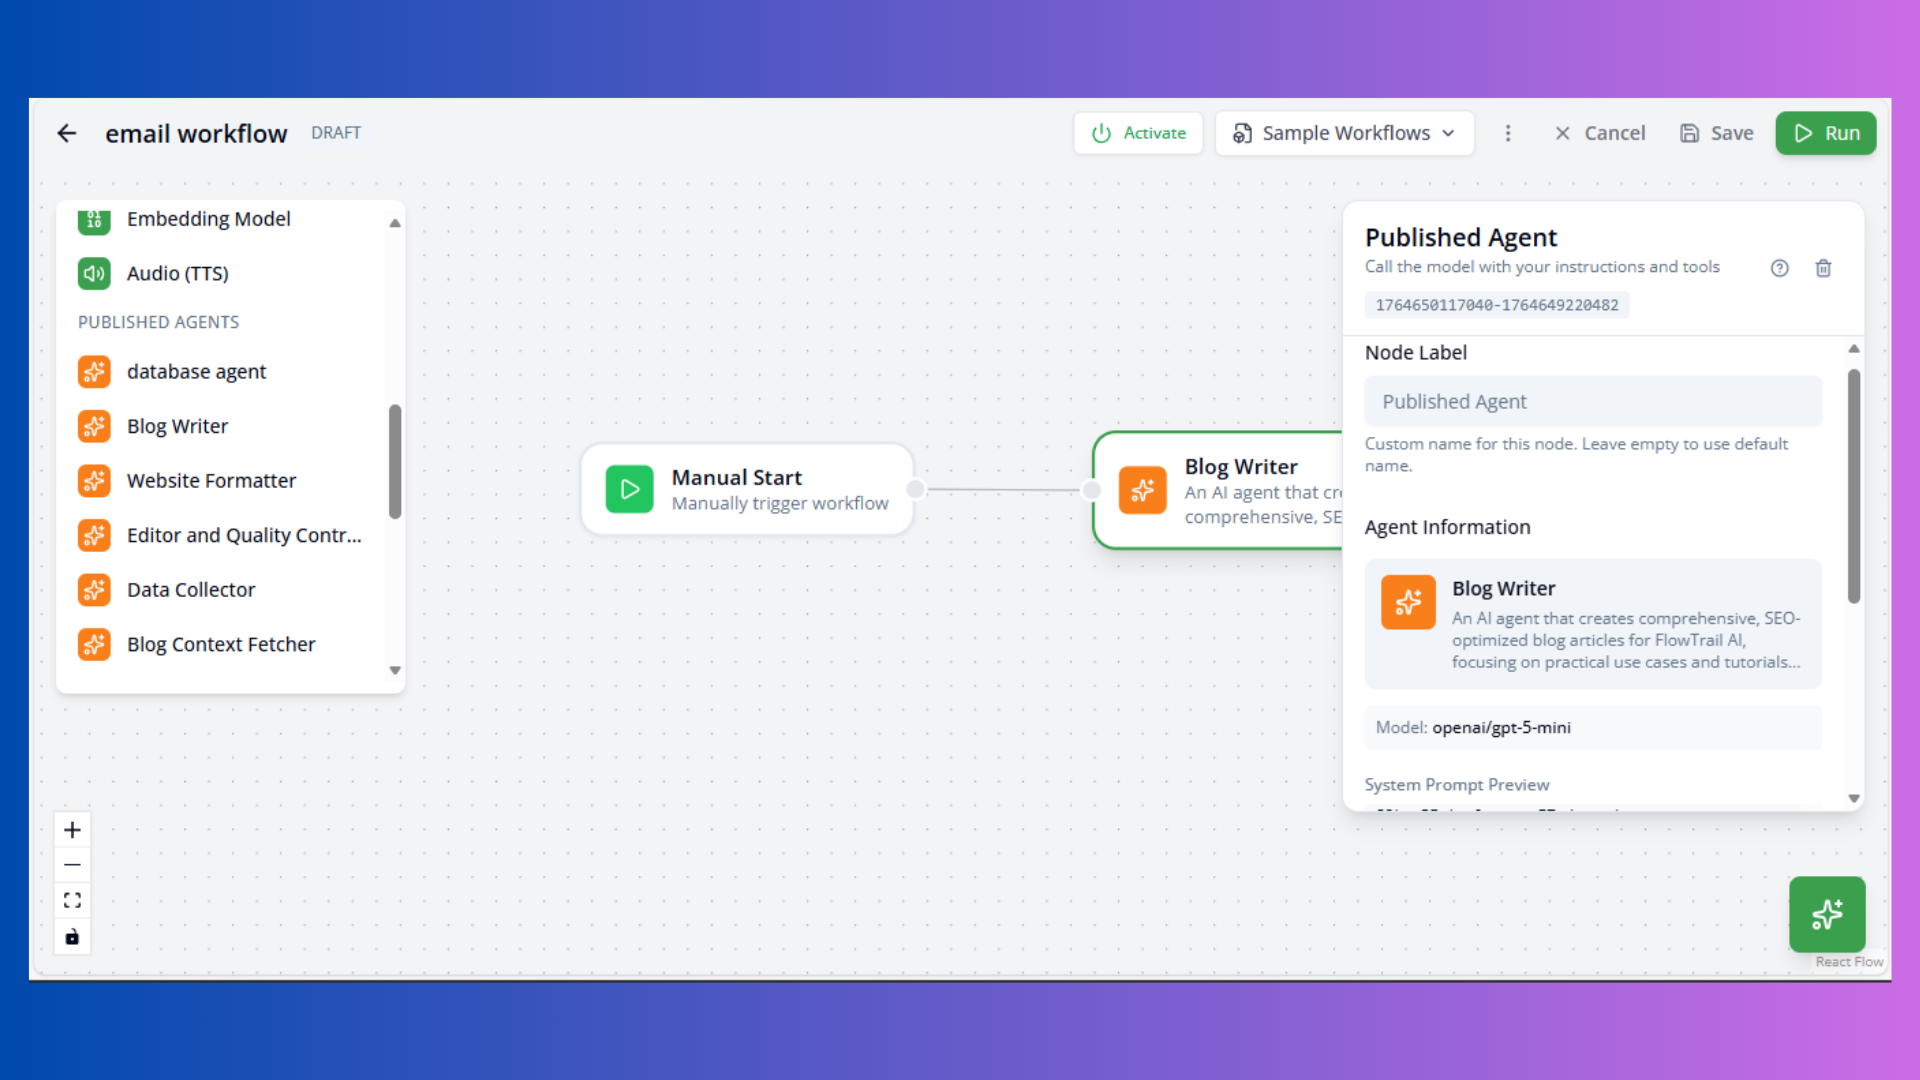
Purpose: Reuse existing configured agents
Configuration:
- Agent: Select published agent
- User Message: Input prompt
- Agent settings inherited from published agent
Use Cases:
- Agent reusability
- Standardized workflows
- Team collaboration
Action Nodes
Execute operations and external integrations.
Tool Node
Purpose: Custom tool definition
Configuration:
- Name: Tool identifier
- Description: Tool purpose
Use Cases:
- Custom integrations
- Specialized operations
HTTP Request Node
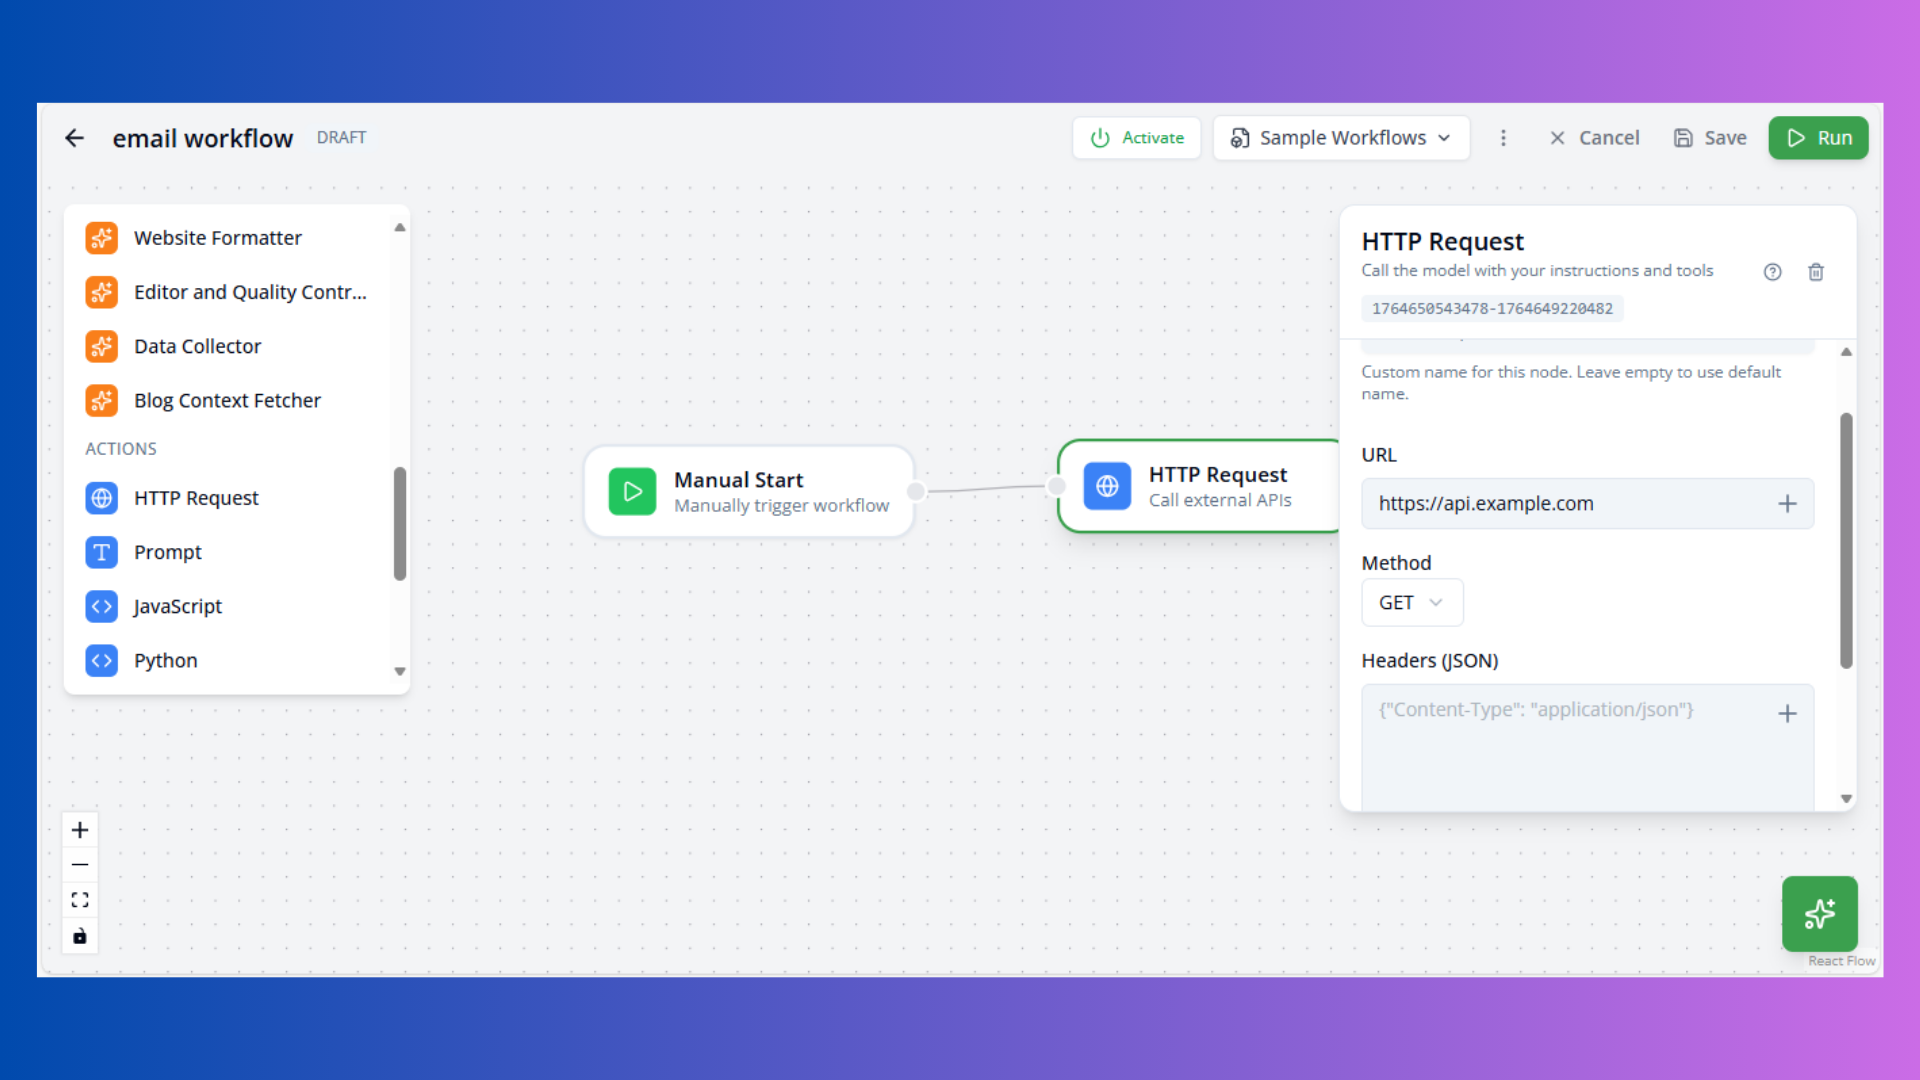
Purpose: Make HTTP API calls
Configuration:
- URL: API endpoint
- Method: GET, POST, PUT, DELETE, PATCH
- Headers: Request headers (JSON)
- Body: Request payload (JSON)
- Authentication: Bearer token or none
Use Cases:
- REST API integration
- External data fetching
- Webhook delivery
Accessing Response:
Output available as result in downstream nodes.
Web Scrape Node
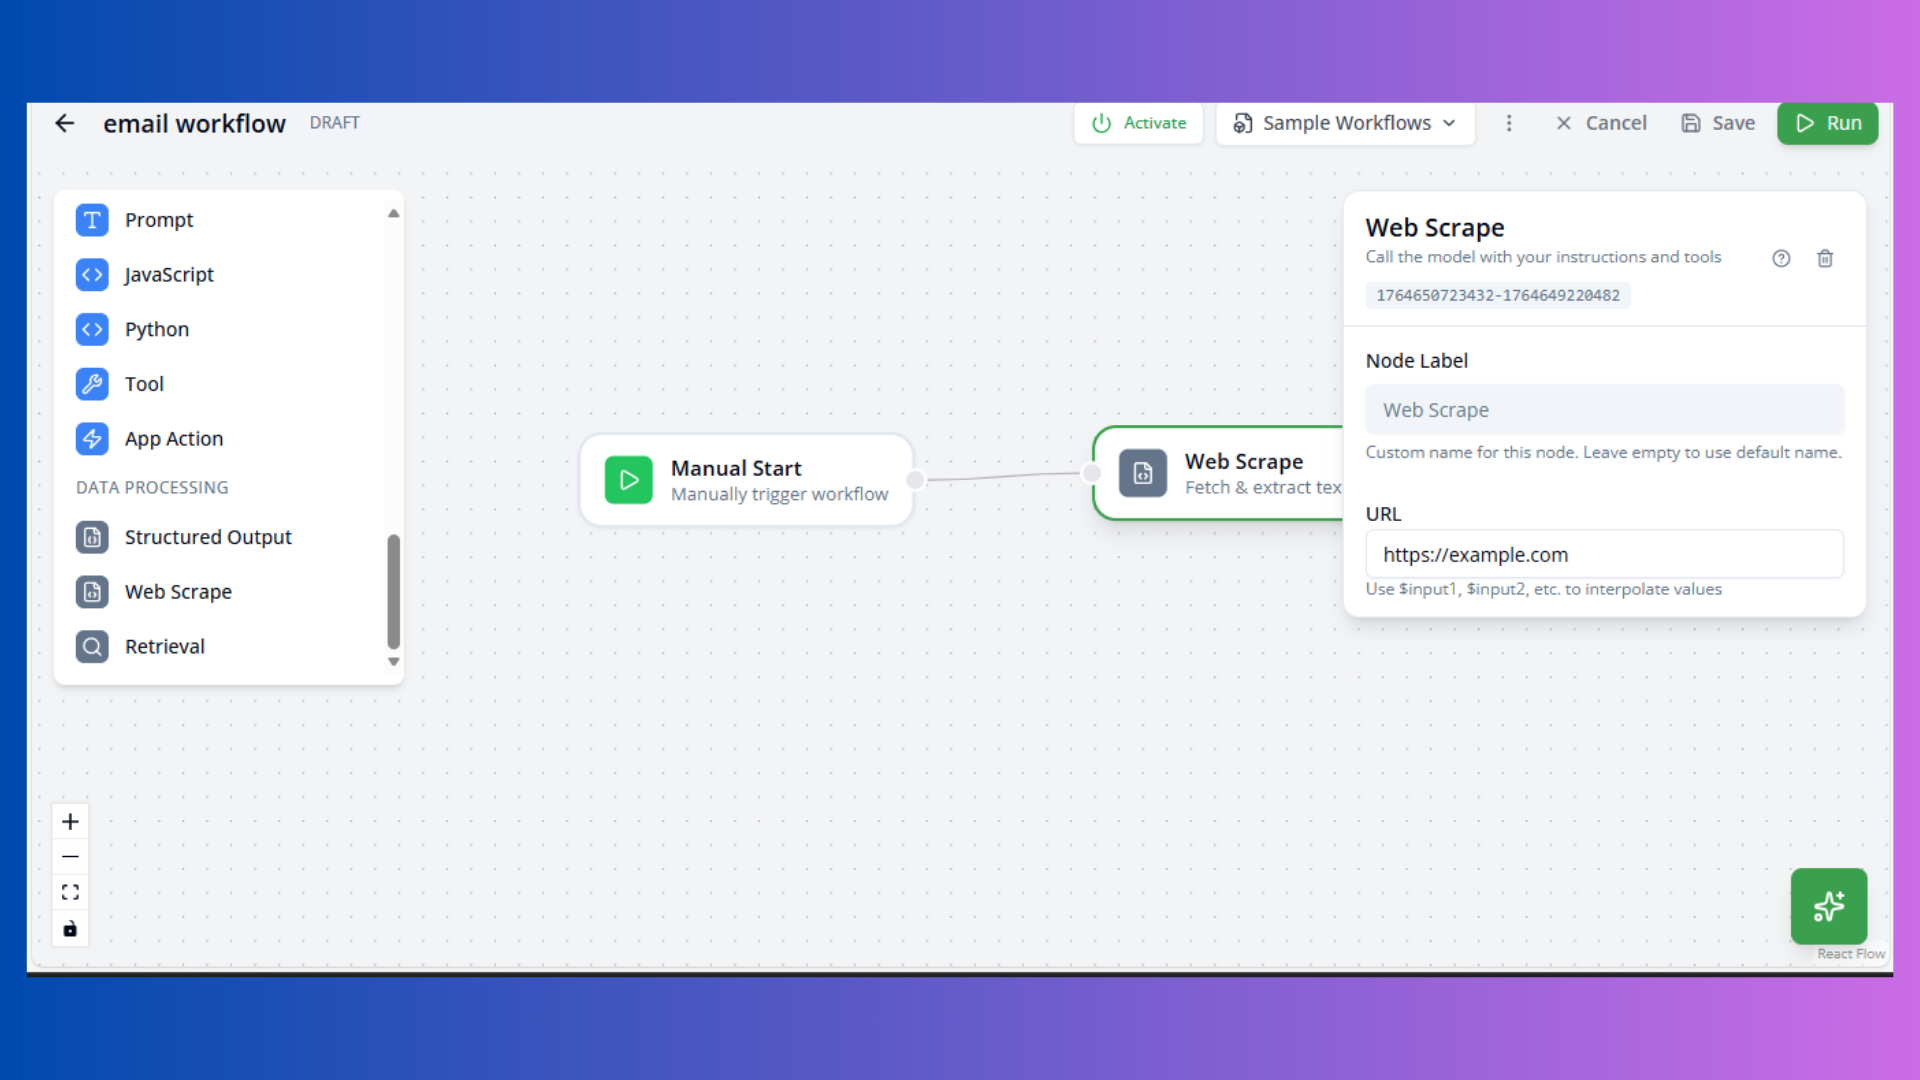
Purpose: Extract content from web pages
Configuration:
- URL: Target web page
- Selector: CSS selector (optional)
Use Cases:
- Content aggregation
- Data collection
- Monitoring
Retrieval Node
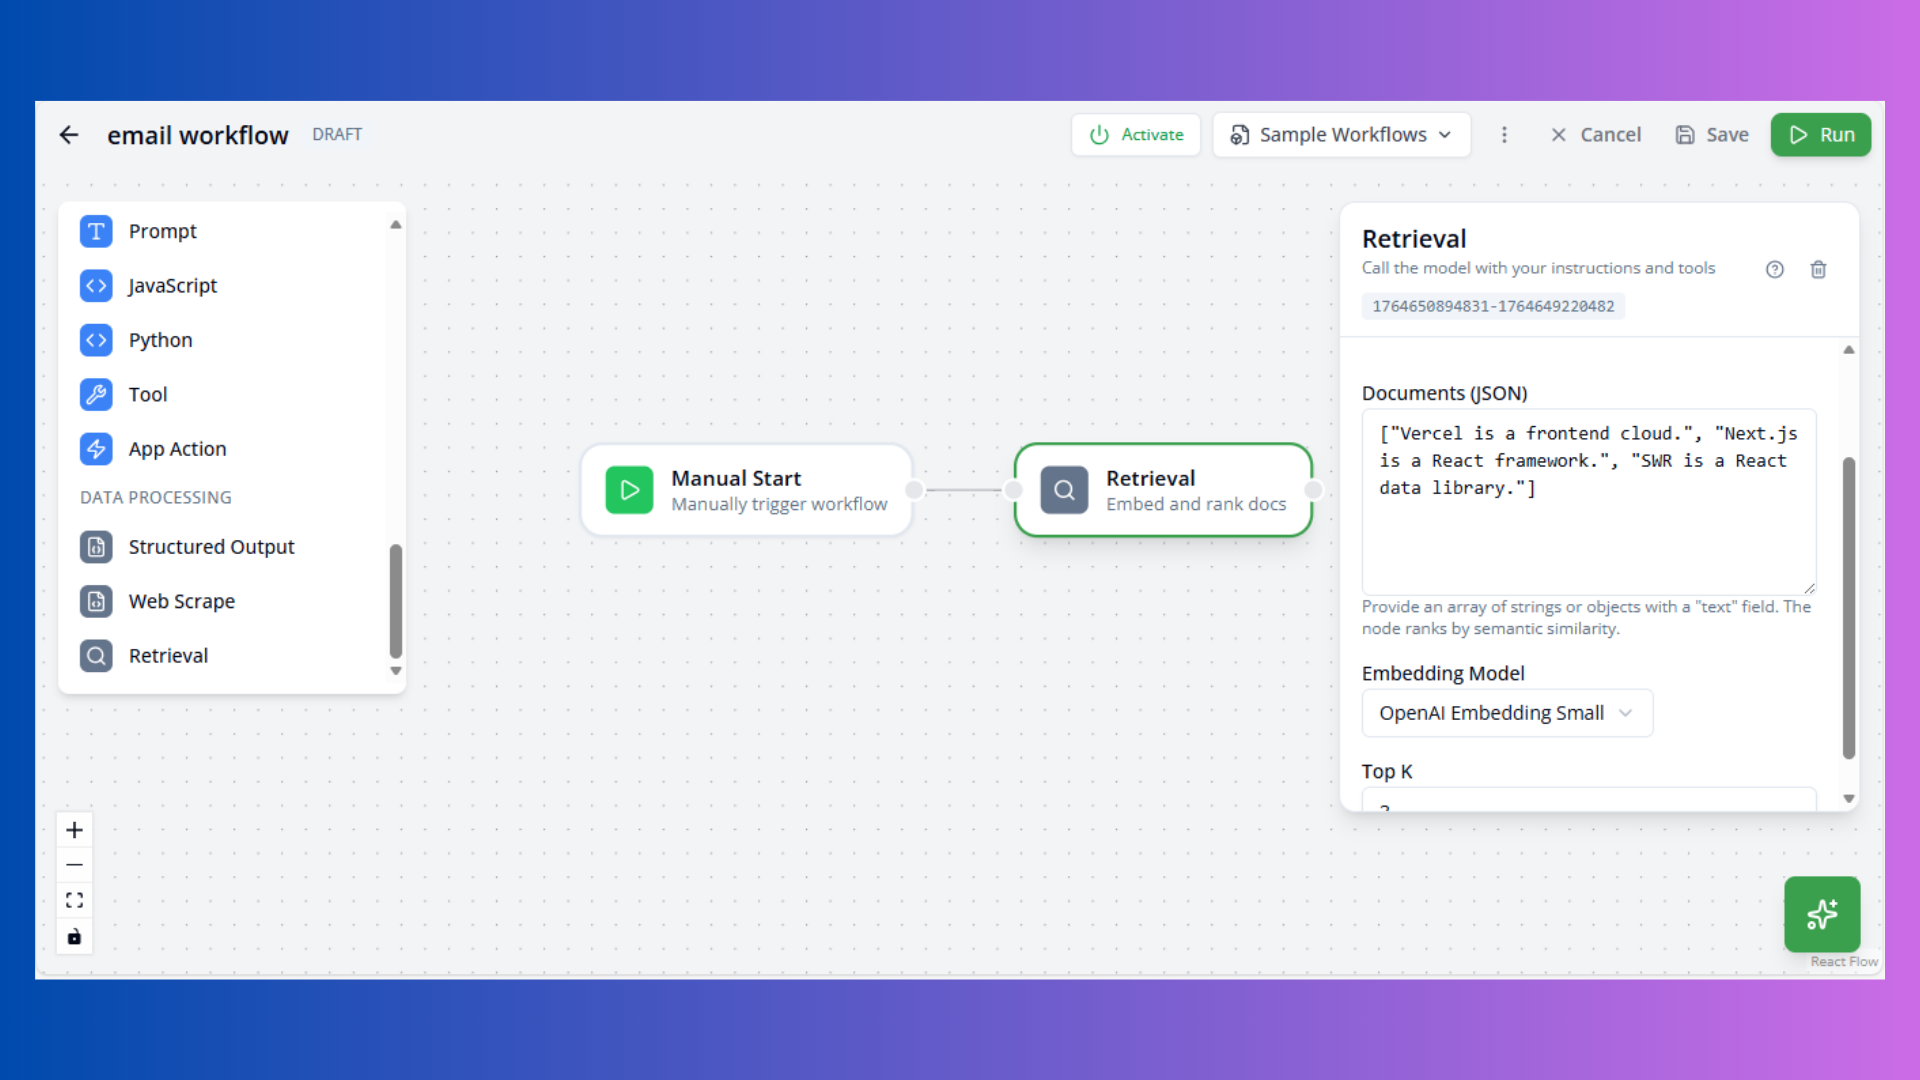
Purpose: Semantic search over documents
Configuration:
- Documents: JSON array of documents
- Top K: Number of results (default: 3)
- Model: Embedding model
Use Cases:
- Knowledge base search
- Document Q&A
- Context retrieval
Example Documents:
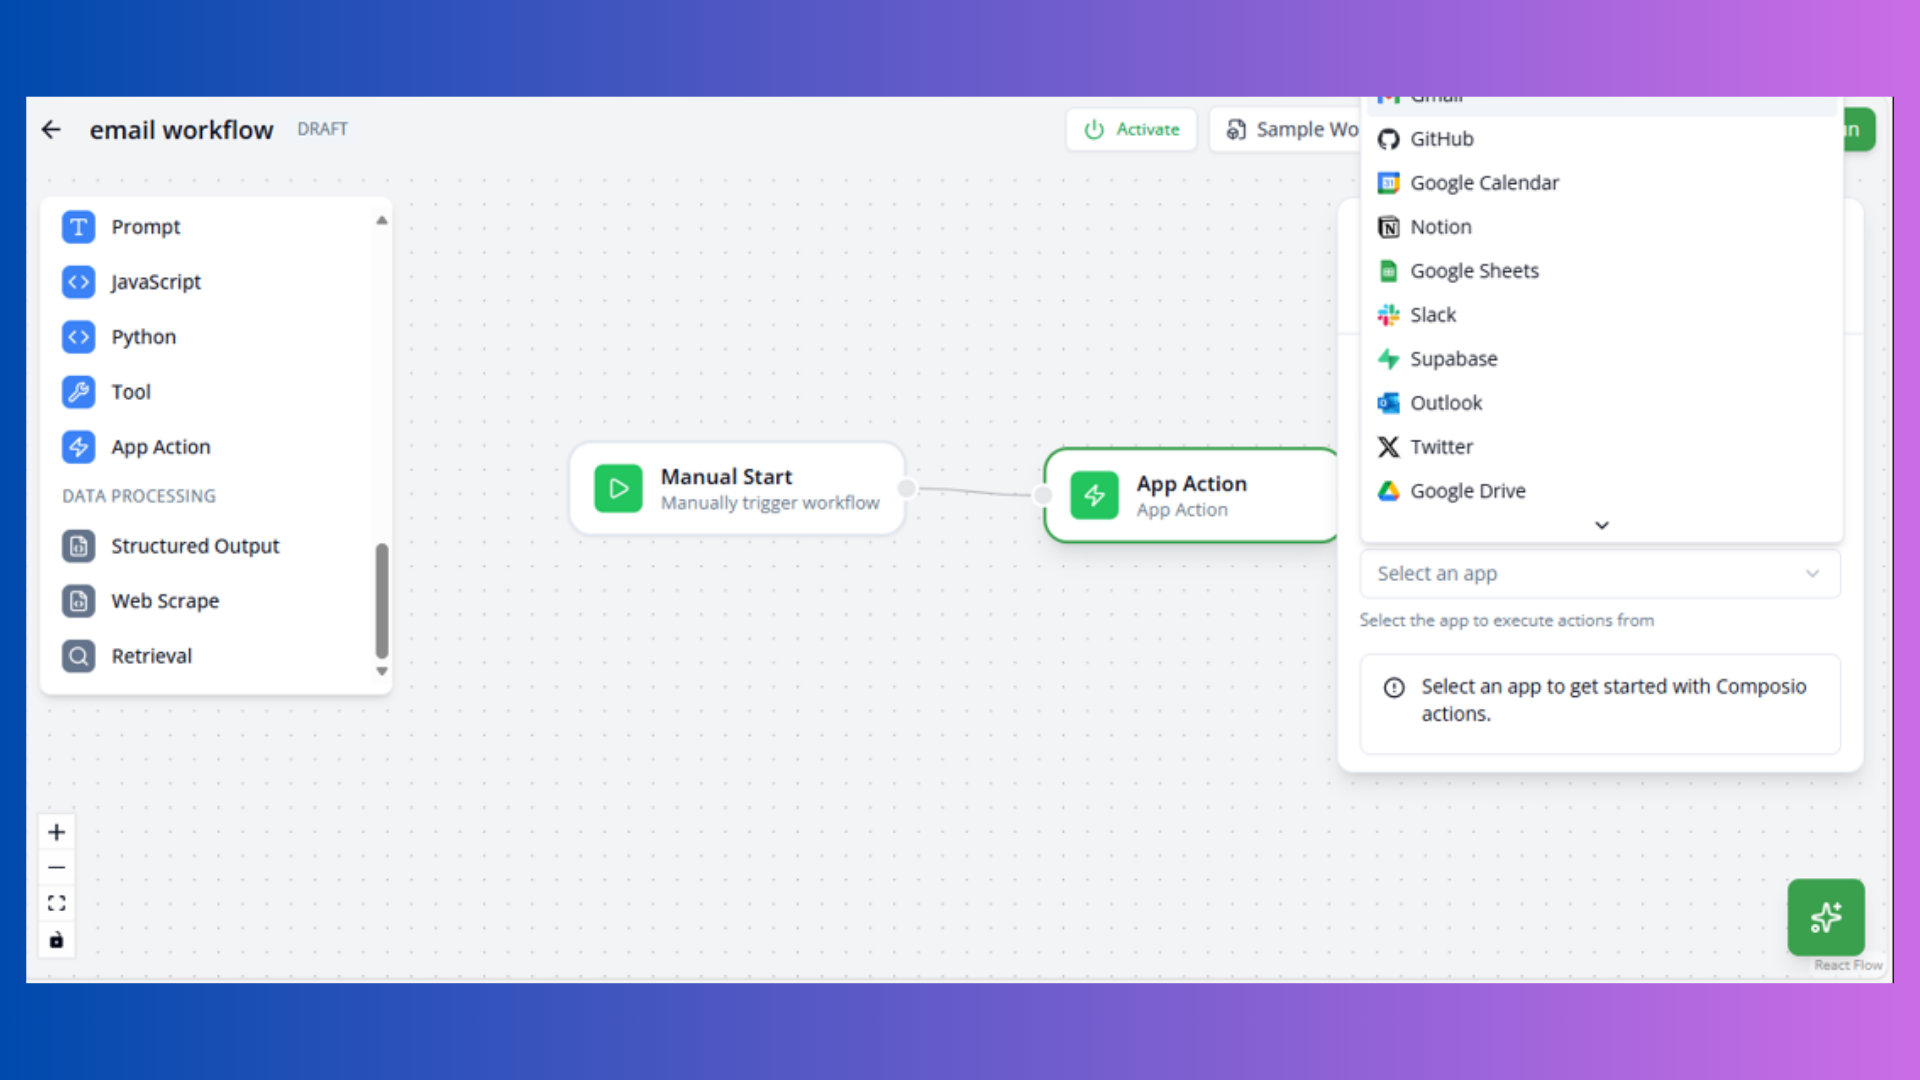
["Vercel is a frontend cloud.", "Next.js is a React framework."]Composio Action Node
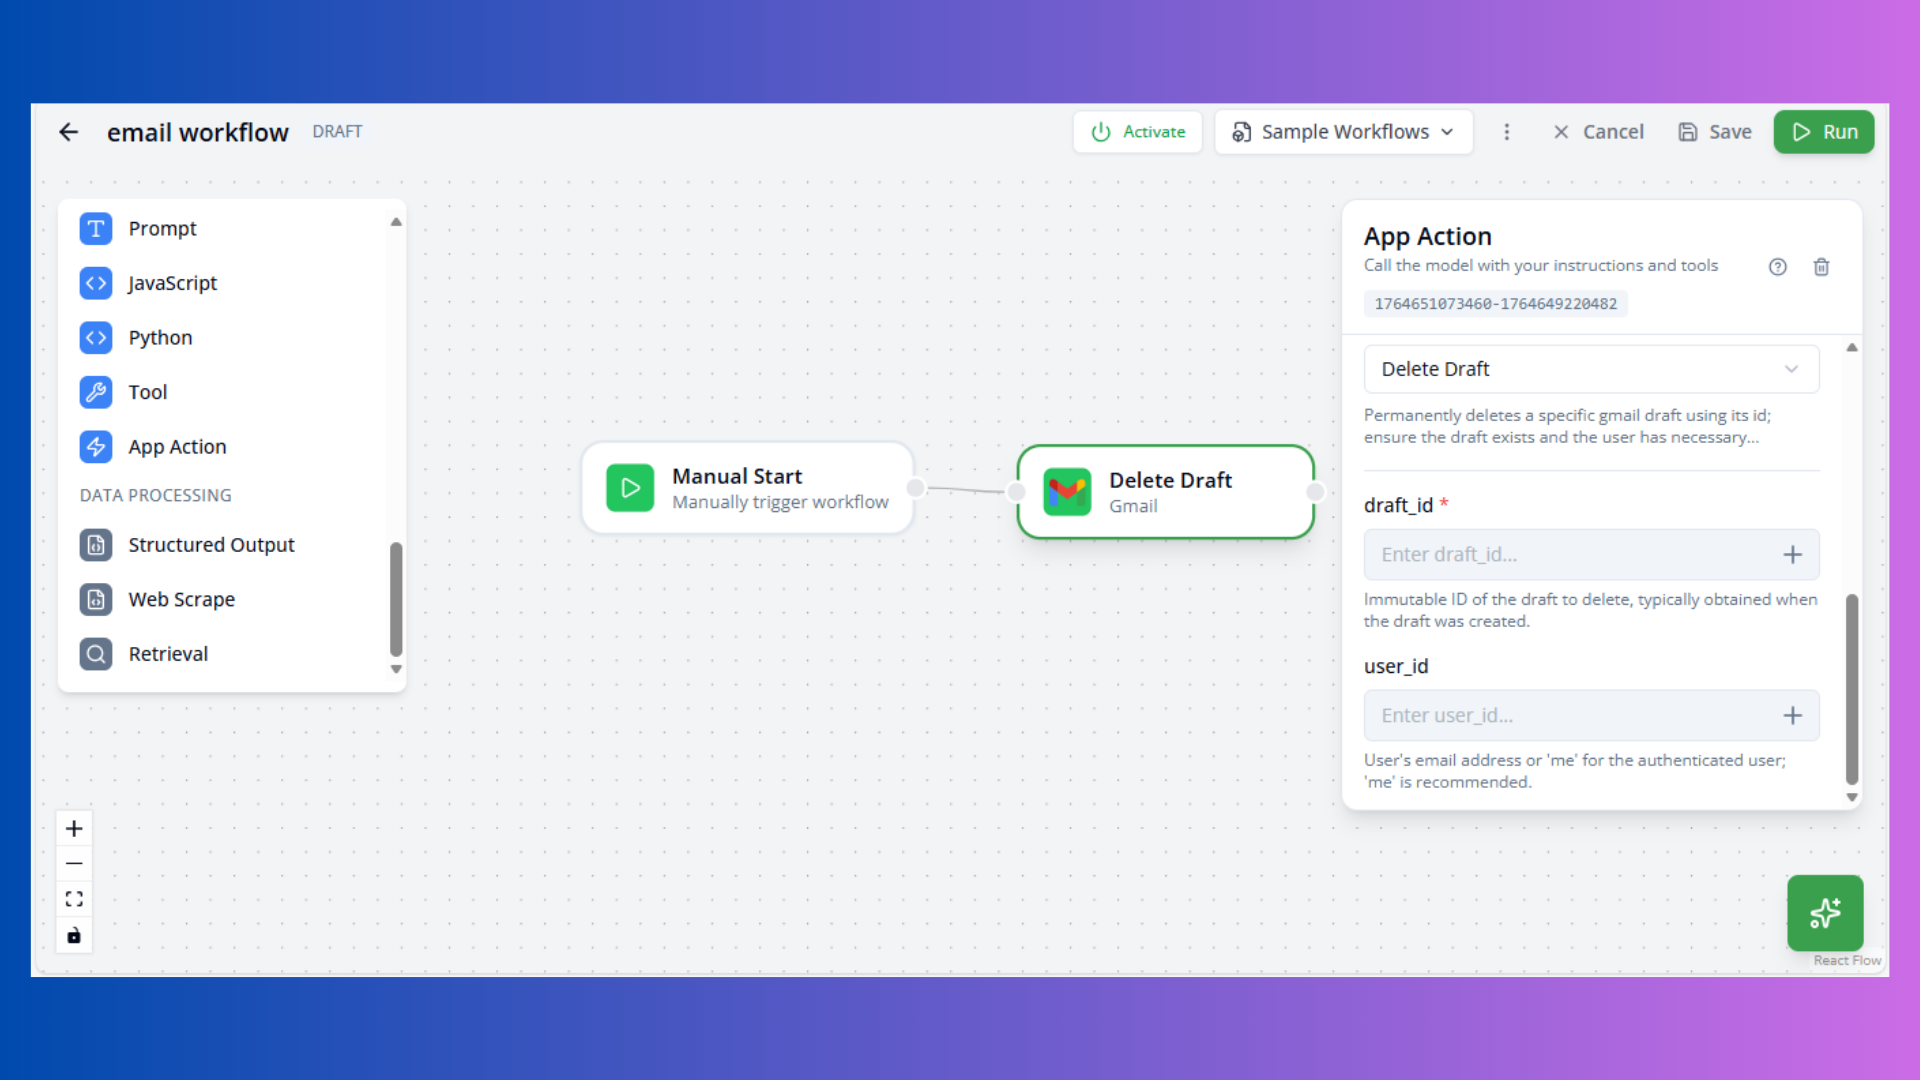
Purpose: Execute Composio integrations
Configuration:
- App: Composio app
- Action: Specific action
- Parameters: Action inputs
Use Cases:
- Third-party integrations
- Multi-platform automation
- SaaS connectivity
JavaScript Node
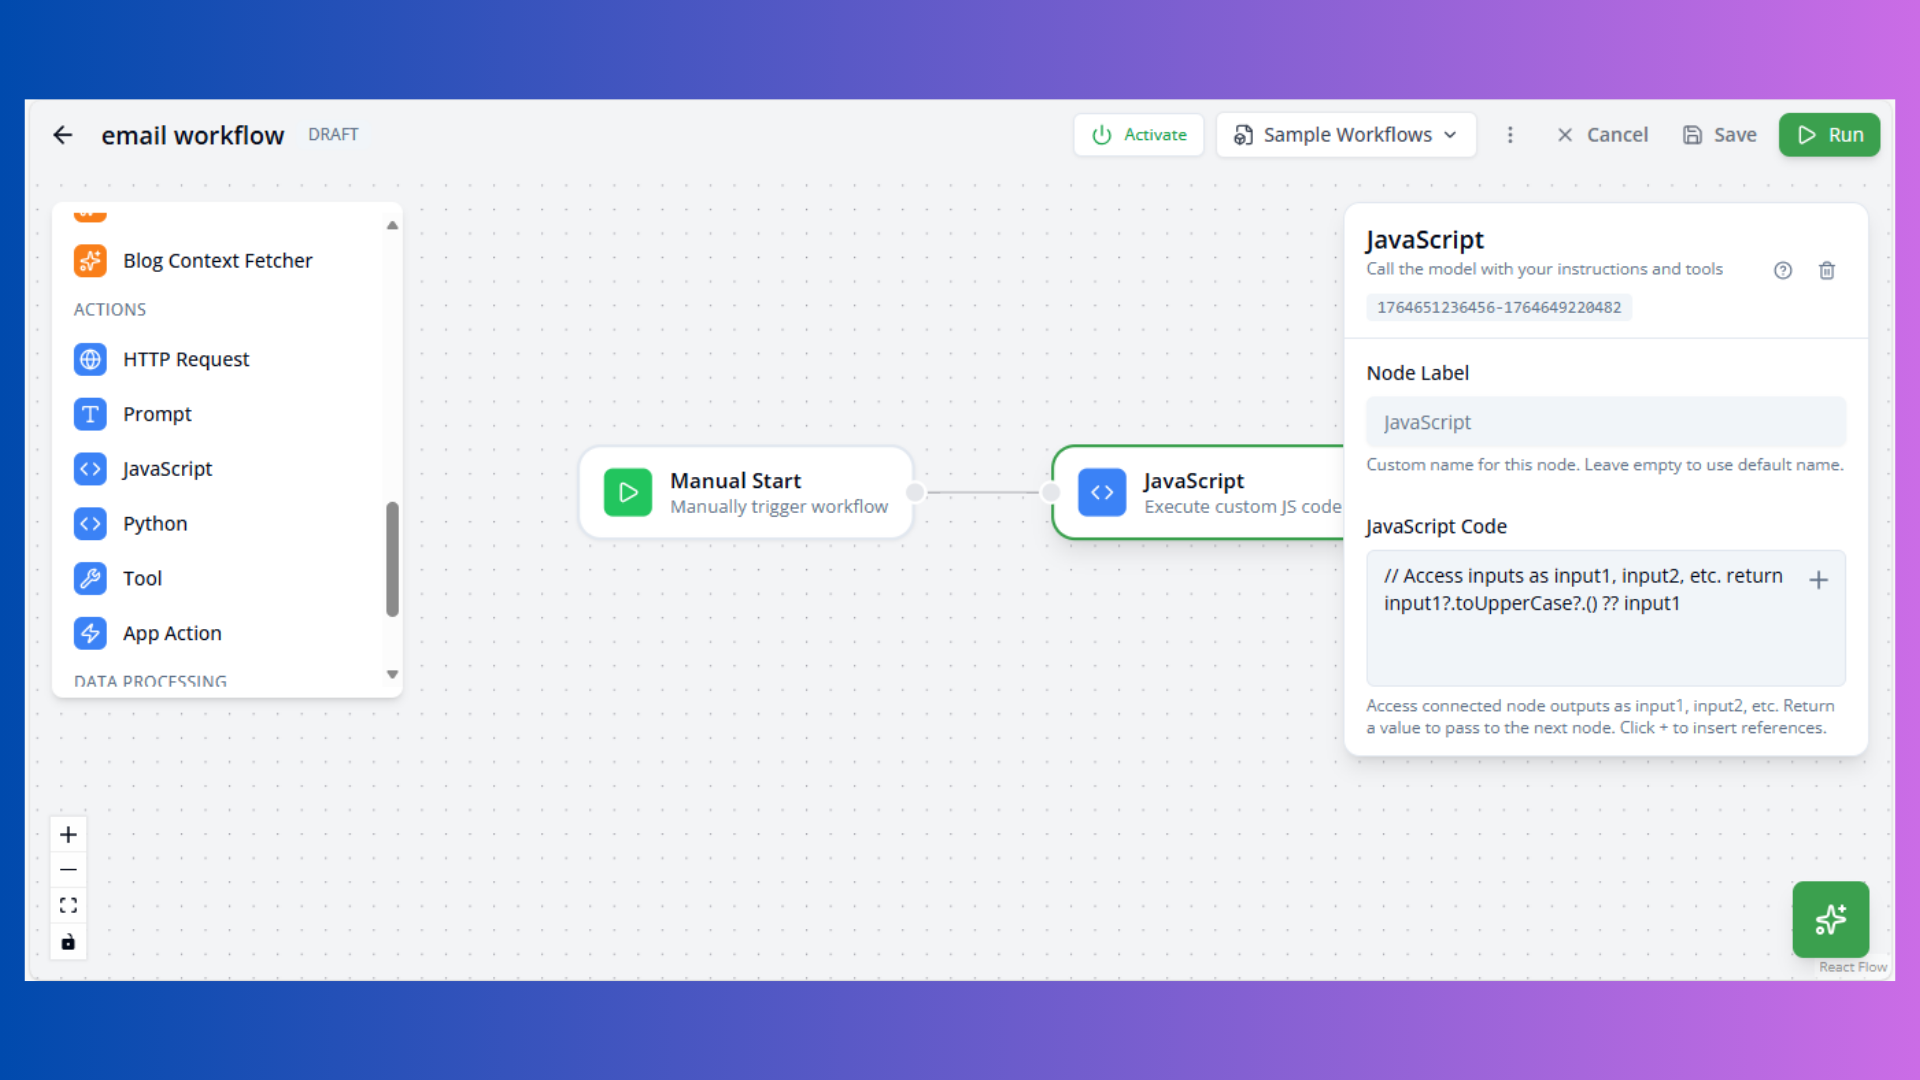
Purpose: Execute custom JavaScript code
Configuration:
- Code: JavaScript function
Available Variables:
input1,input2, etc.: Previous node outputsreturn: Function return value
Example:
// Transform input to uppercase
return input1?.toUpperCase?.() ?? input1
Use Cases:
- Data transformation
- Custom logic
- Calculations
Python Node
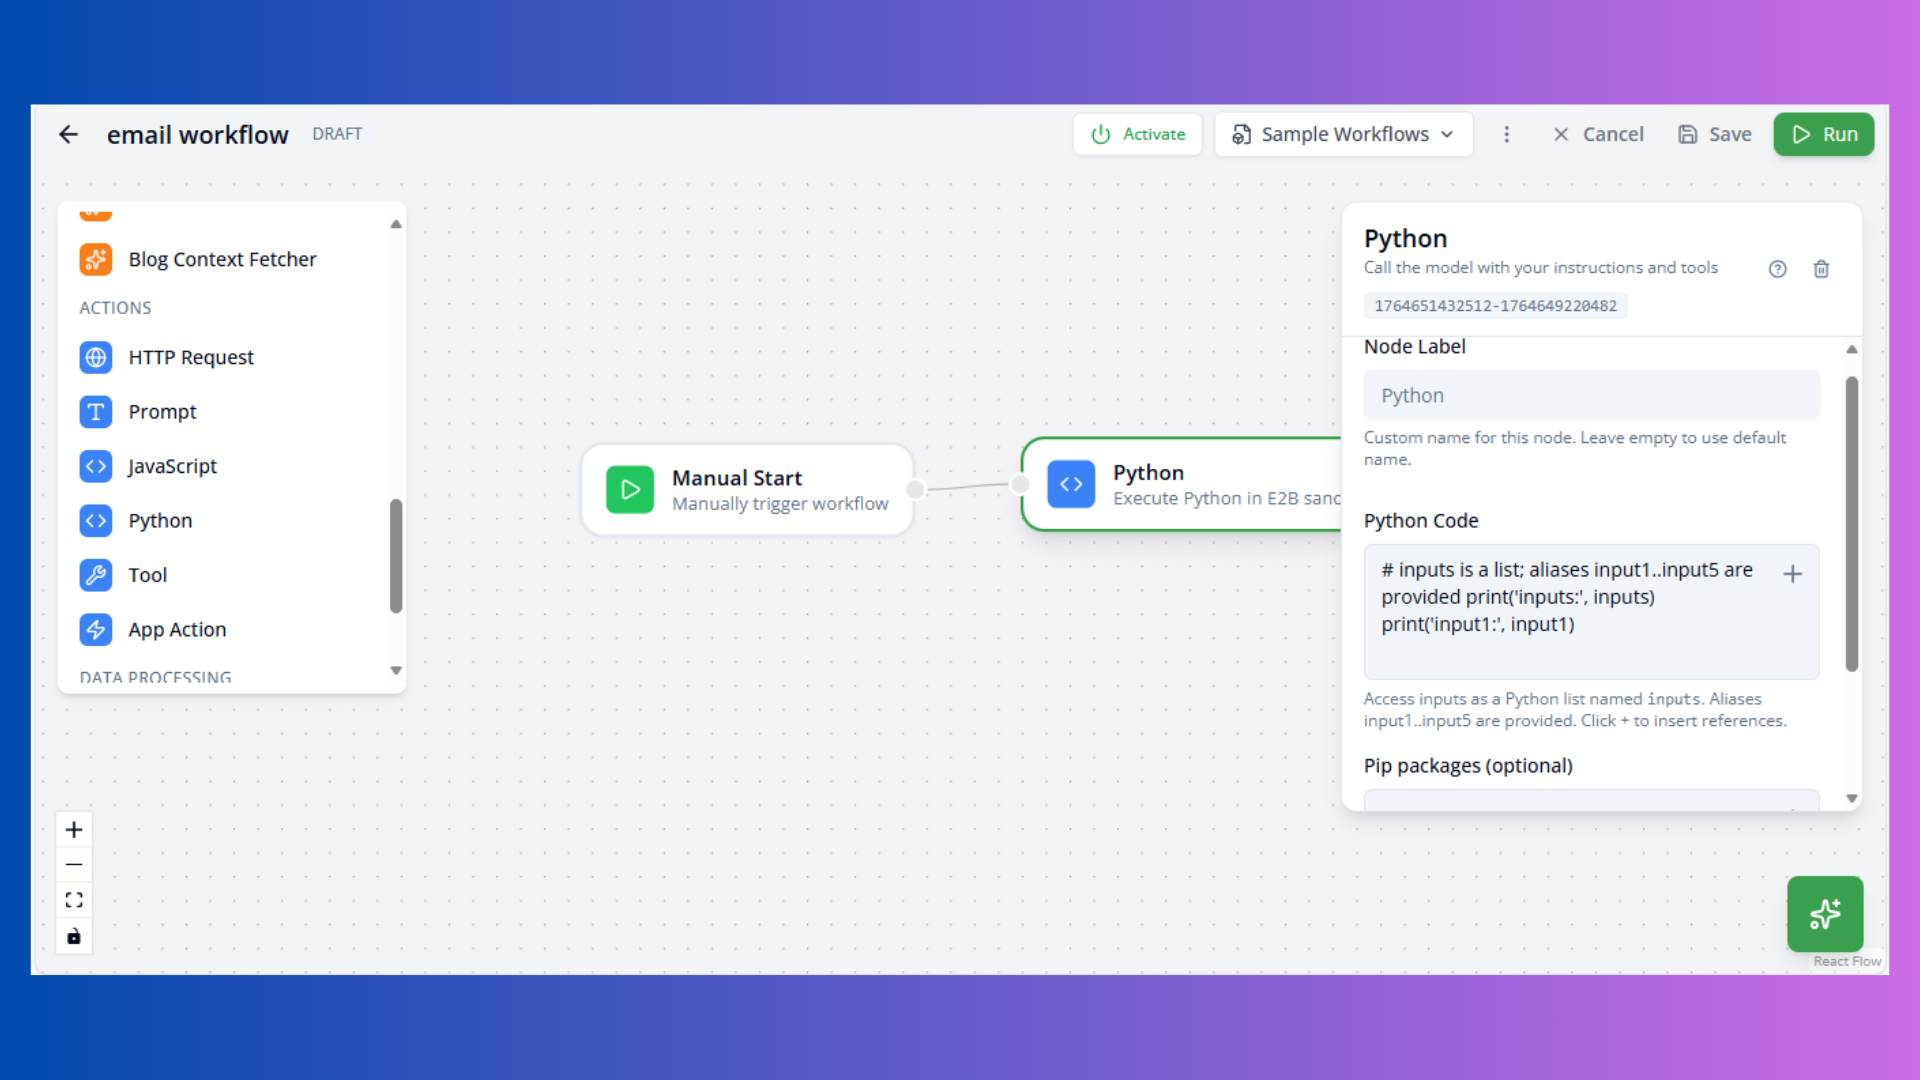
Purpose: Execute Python code
Configuration:
- Code: Python script
- Packages: Required packages (comma-separated)
Available Variables:
inputs: List of all inputsinput1,input2, etc.: Individual inputsprint(): Output to logs
Example:
# Access inputs
print('input1:', input1)
result = input1.upper()
Use Cases:
- Data science workflows
- ML model inference
- Complex calculations
Control Flow Nodes
Manage workflow execution paths.
Conditional Node
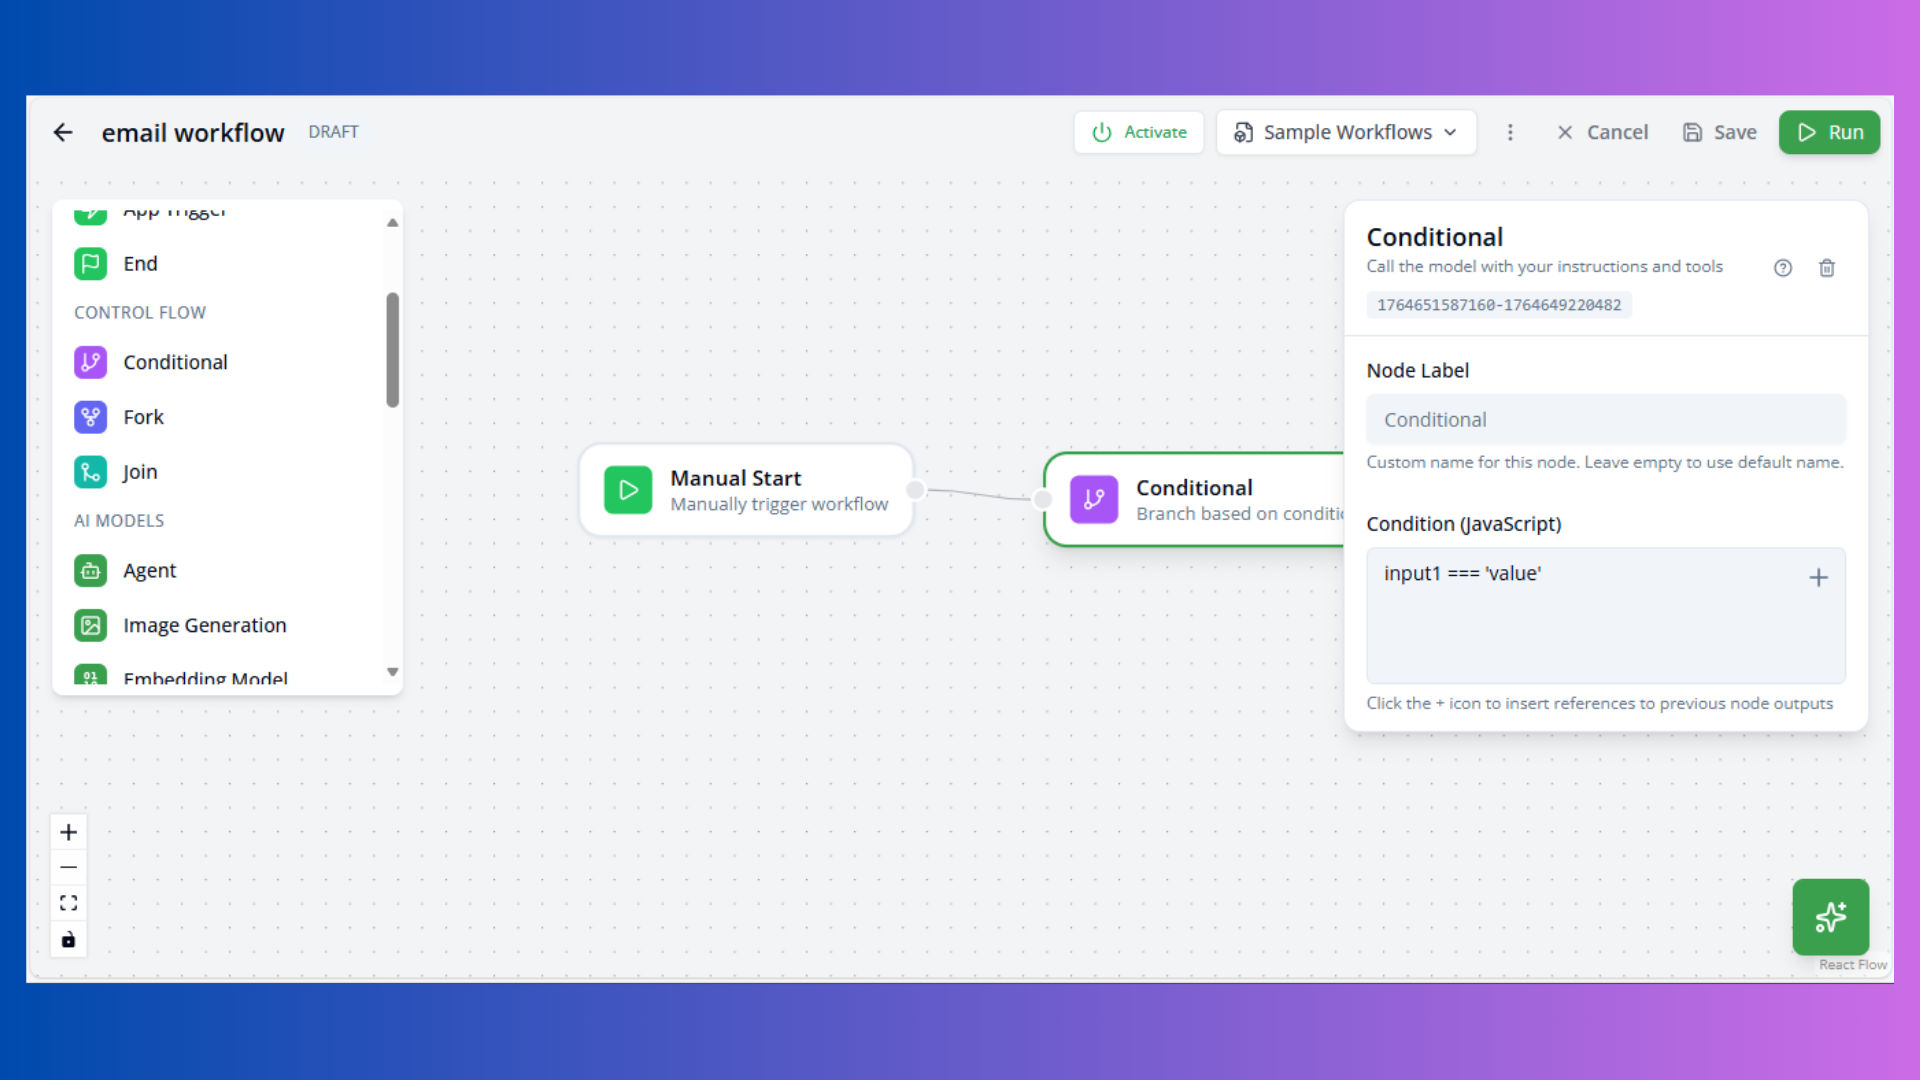
Purpose: Branch execution based on condition
Configuration:
- Condition: JavaScript expression (e.g.,
input1 === 'value')
Outputs:
- True Handle: Condition passes
- False Handle: Condition fails
Use Cases:
- Decision logic
- Error handling
- Dynamic routing
Condition Examples:
input1 > 100- Numeric comparisoninput1.includes('error')- String matchinginput1?.status === 'success'- Object property check
Fork Node
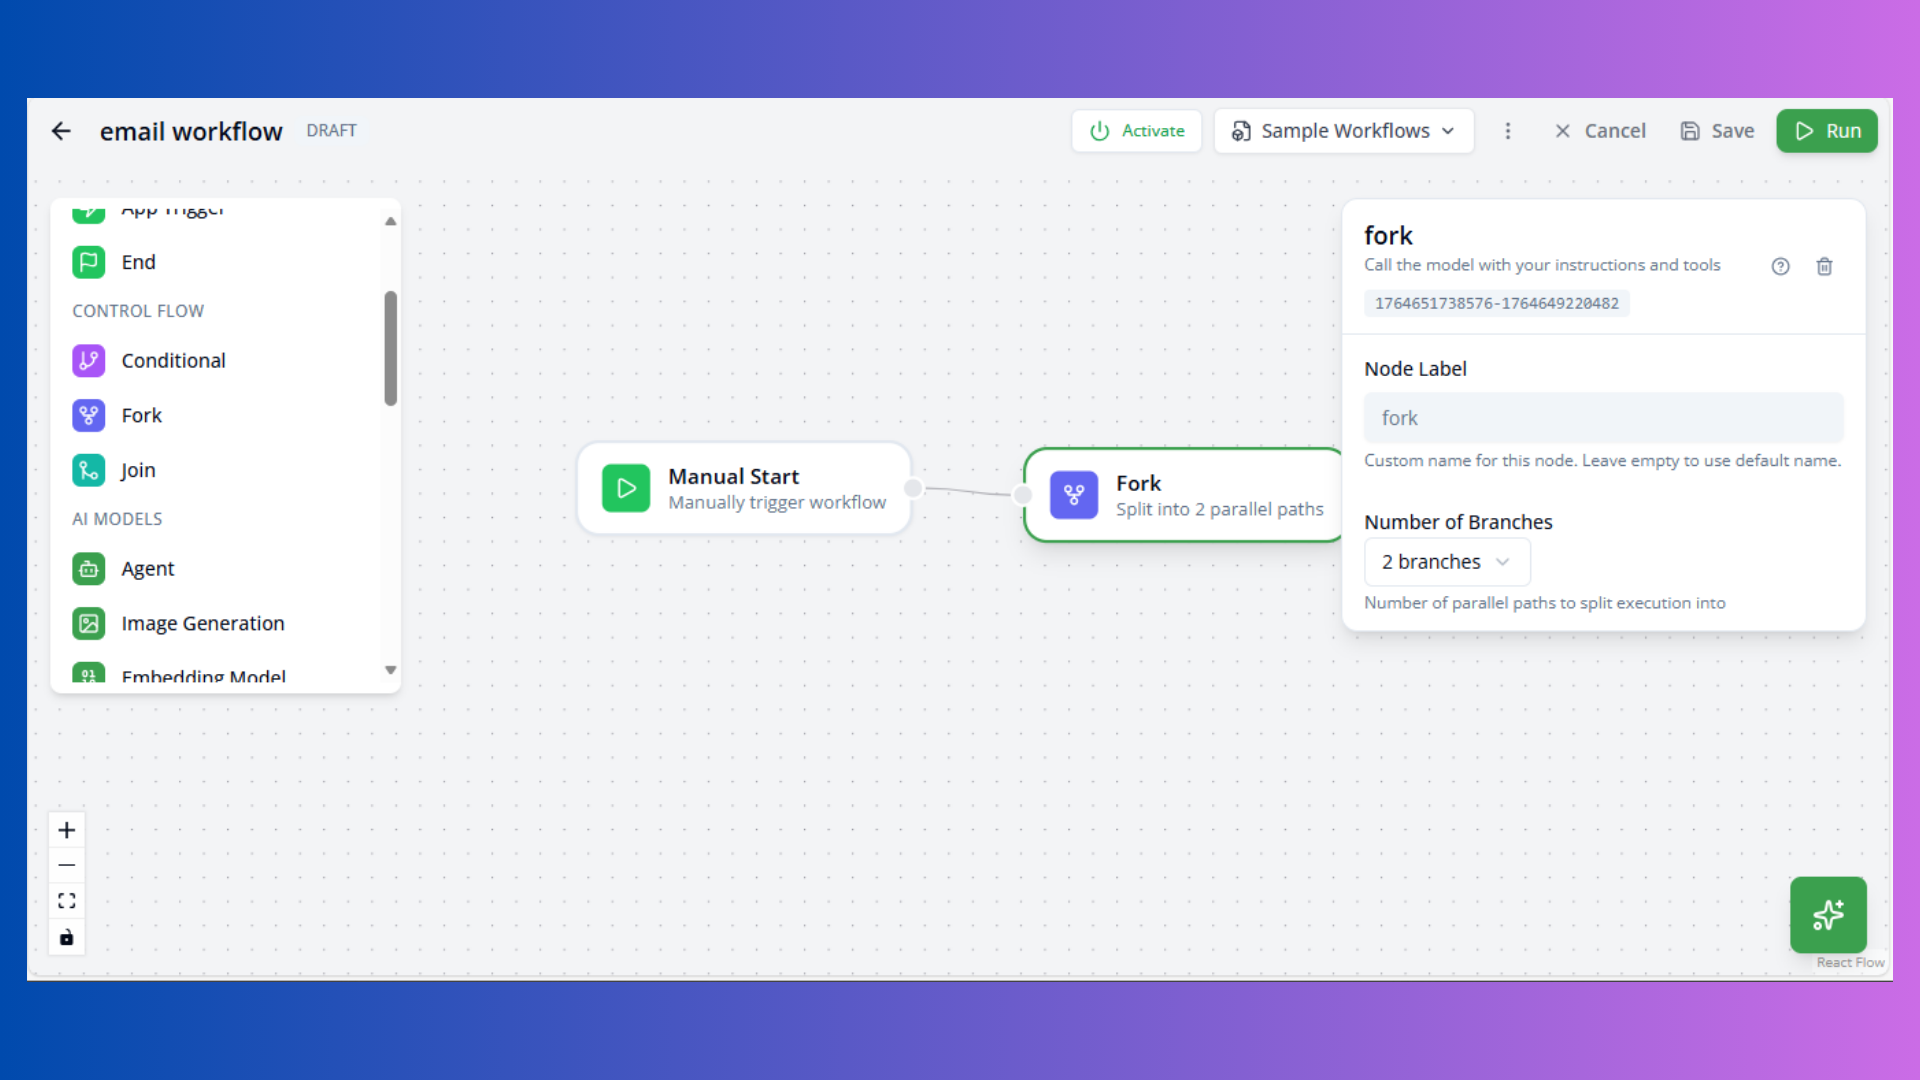
Purpose: Split workflow into parallel paths
Configuration:
- Branches: Number of parallel outputs
Use Cases:
- Parallel processing
- Multiple simultaneous actions
- Independent operations
Note: Fork creates multiple execution paths. Use Join node to merge results.
Join Node
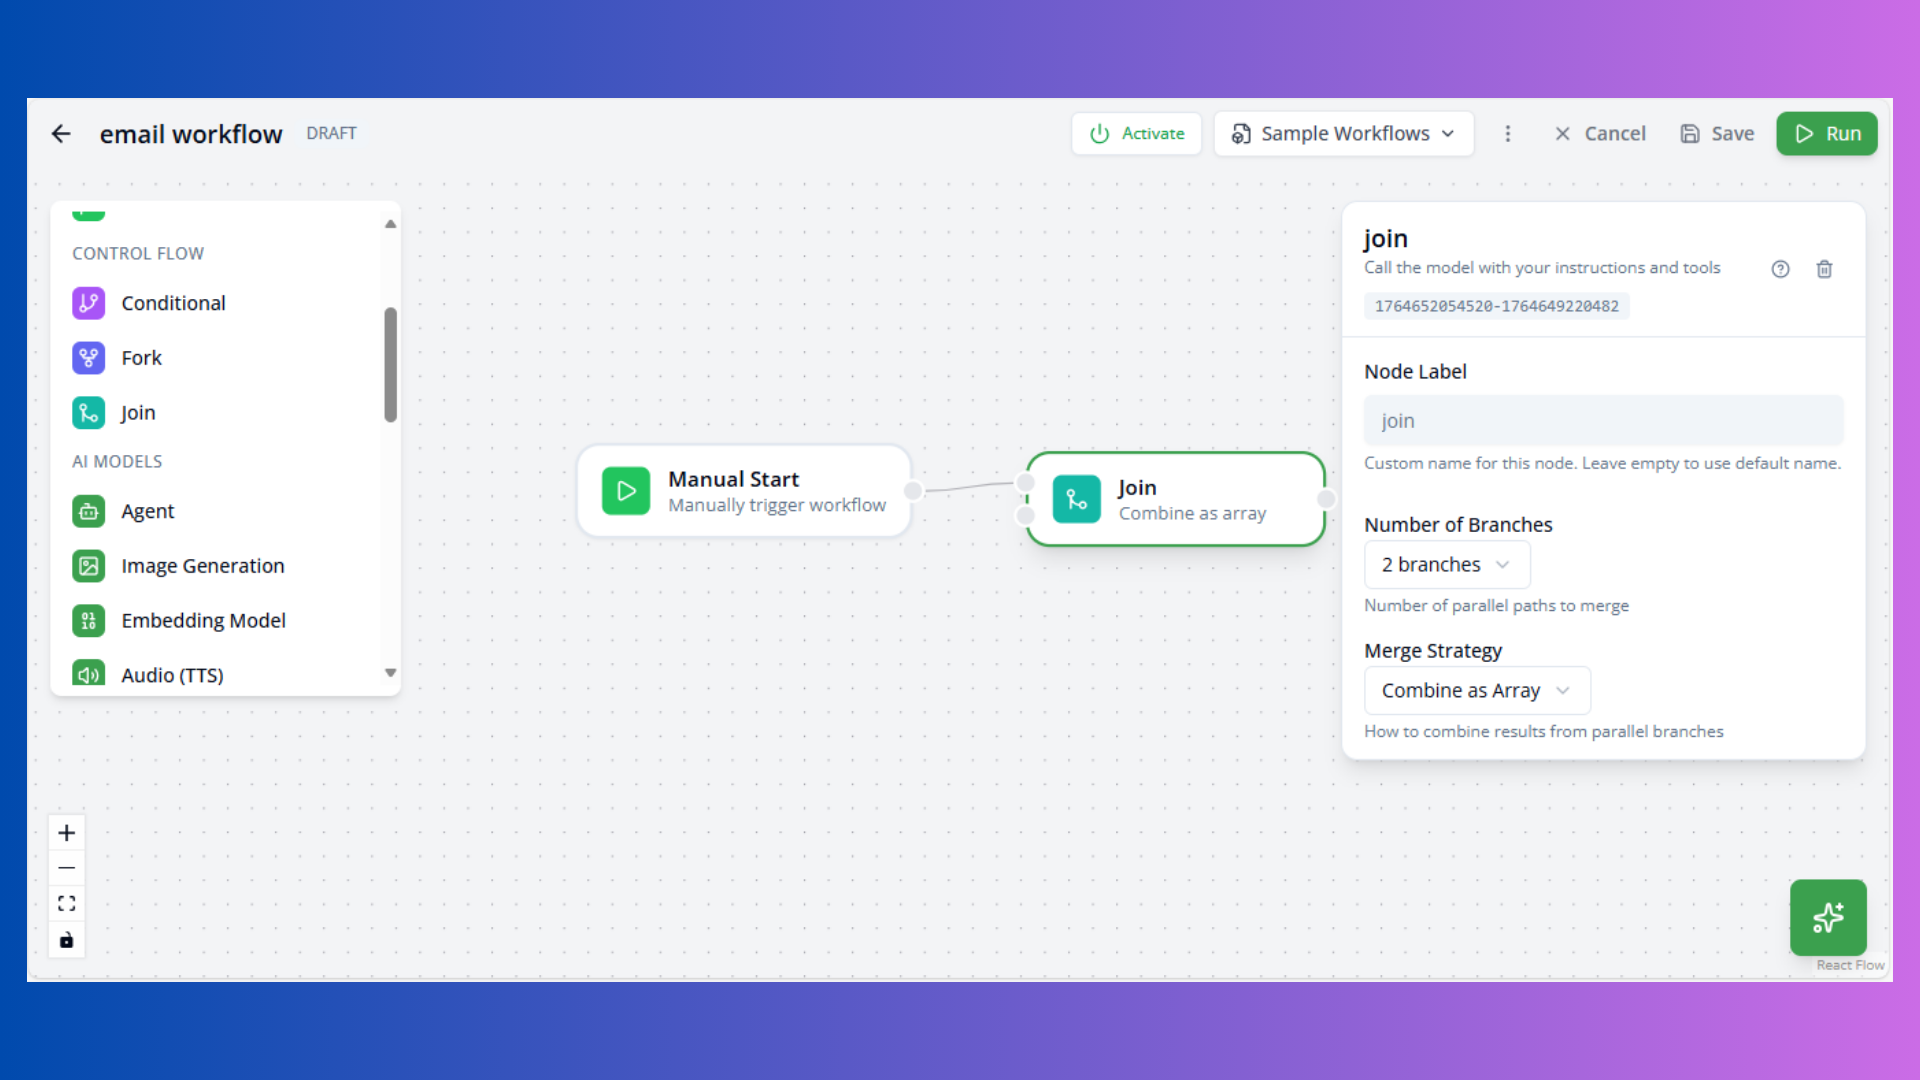
Purpose: Merge multiple parallel paths
Configuration:
- Branches: Number of inputs to wait for
- Merge Strategy:
array: Combine all inputs as arrayobject: Merge as object properties
Use Cases:
- Aggregating parallel results
- Synchronization points
- Data combination
End Node
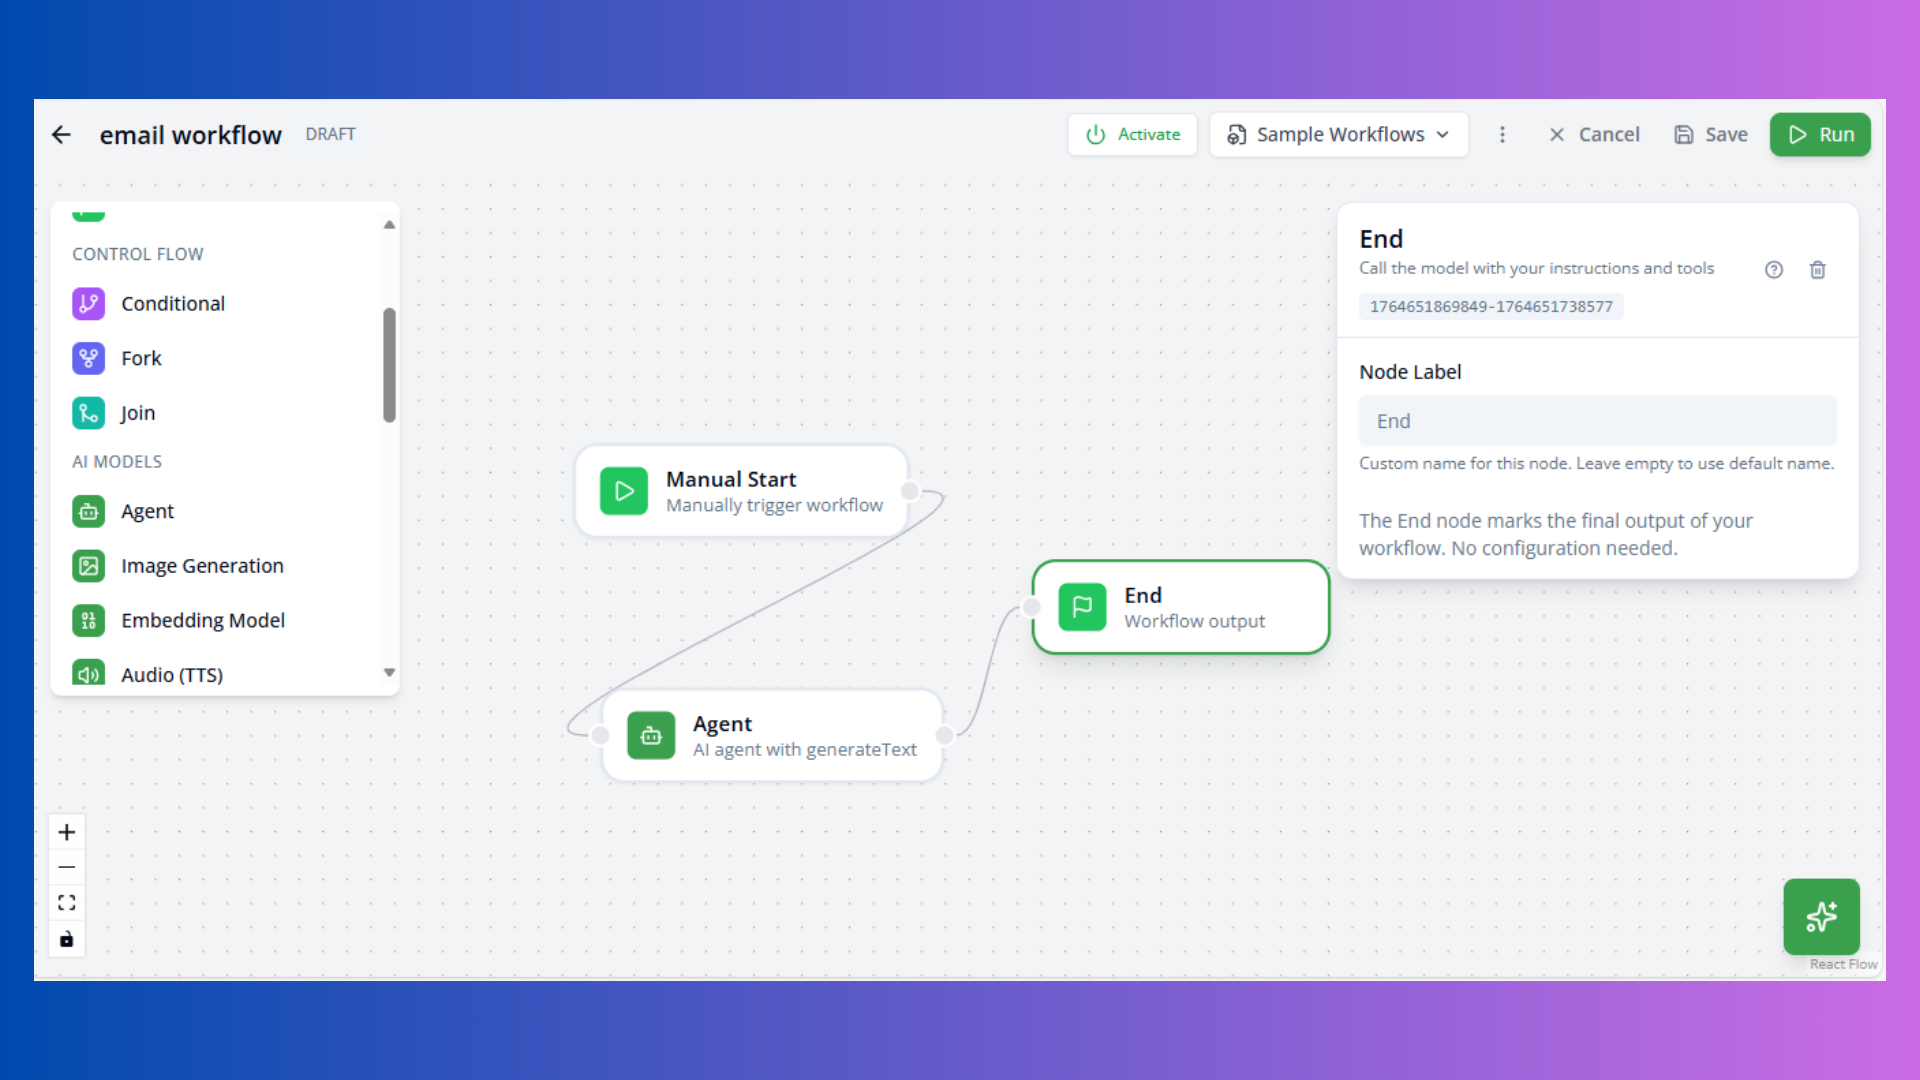
Purpose: Workflow termination point
Configuration: No configuration required
Use Cases:
- Explicit workflow completion
- Multiple end points
- Success/failure paths
Connection Rules
Handle Constraints
Regular Nodes:
- Input: One incoming connection only
- Output: One outgoing connection only
Special Nodes:
- Fork/Conditional: Multiple outputs allowed
- Join: Multiple inputs allowed
Connection Errors
“Node can only have one outgoing connection” Solution: Use Fork node to split into multiple paths
“Node can only have one incoming connection” Solution: Use Join node to merge multiple paths
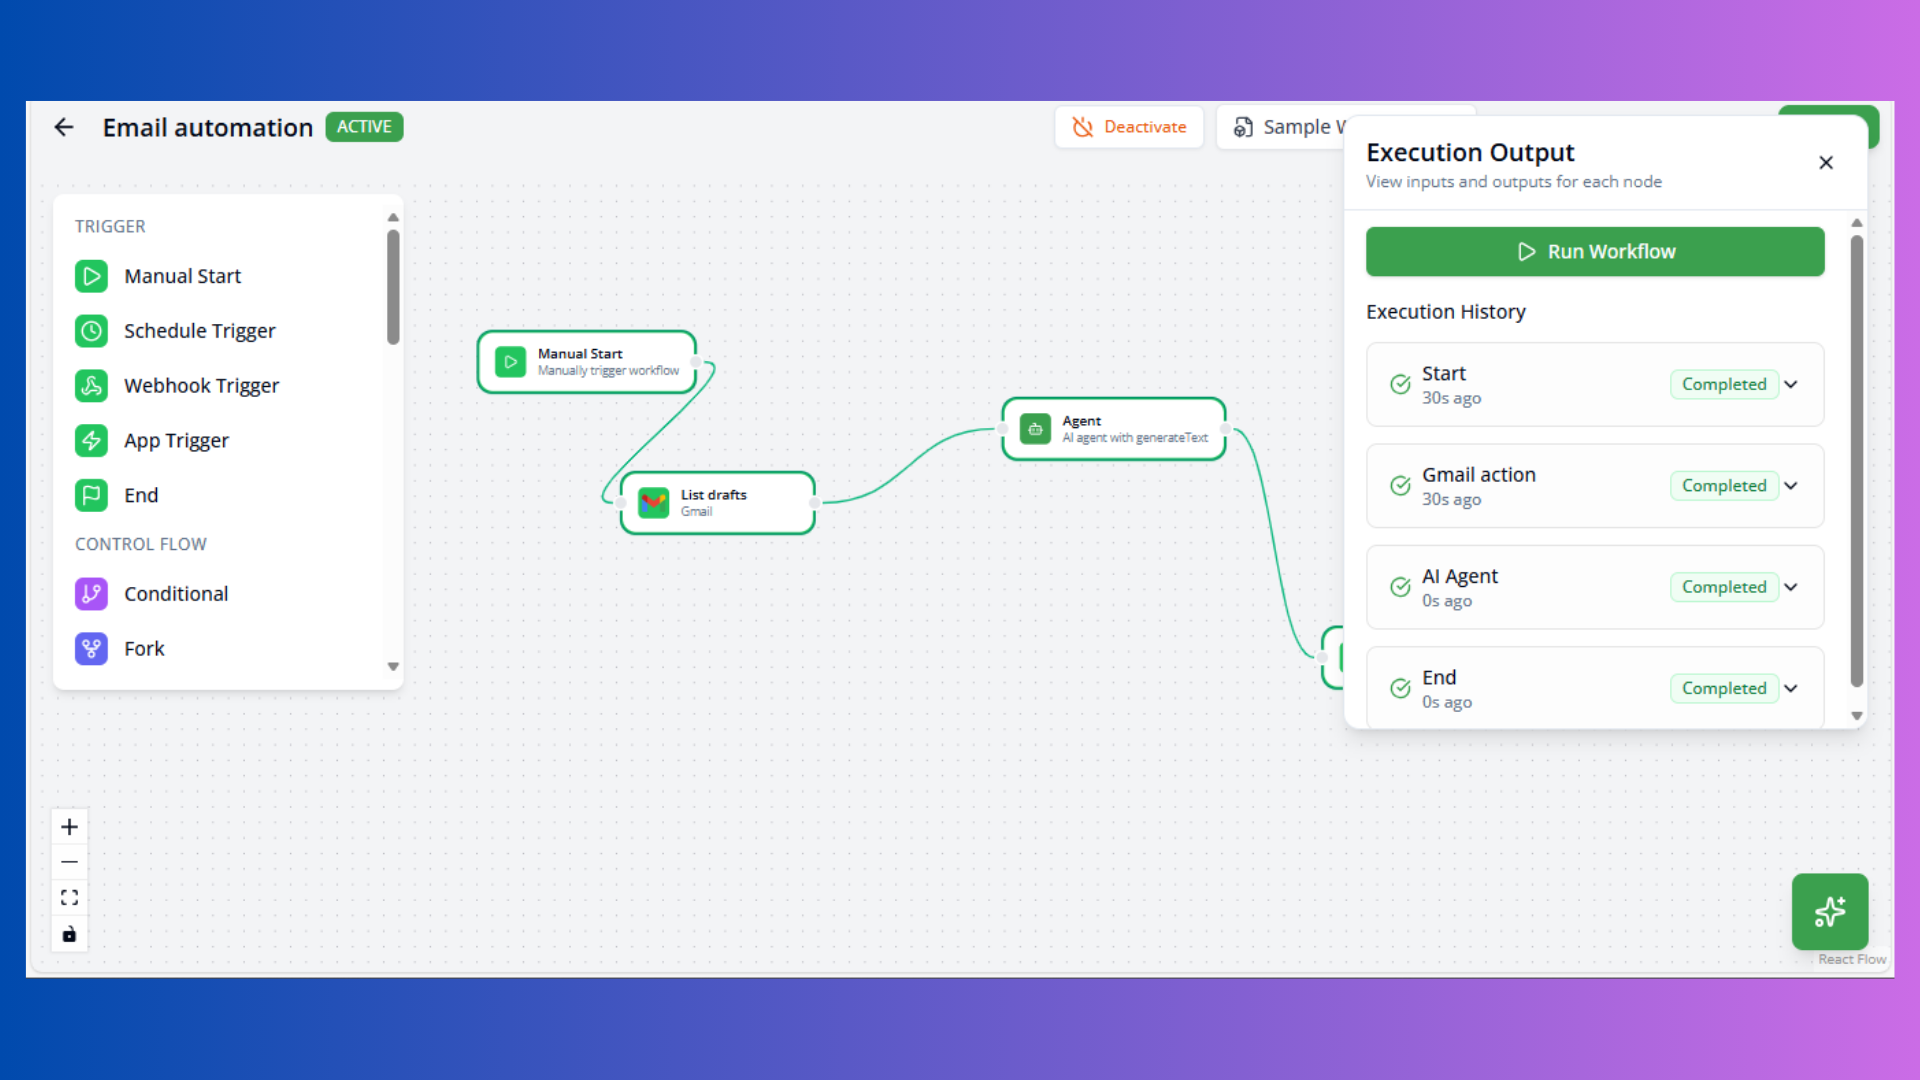
Workflow Execution
Testing Workflows
- Click Run button in toolbar
- Execution panel opens at bottom
- View real-time node status:
- Idle: Not yet executed
- Running: Currently processing
- Completed: Finished successfully
- Error: Failed with error
- Check execution logs for debugging
- Review node outputs
Execution Flow
- Nodes execute in sequence following connections
- Parallel paths (from Fork) execute concurrently
- Join waits for all inputs before proceeding
- Errors stop execution at failed node
Debug Tips
- Check node outputs in execution panel
- Review console logs for errors
- Test individual nodes before connecting
- Use simple workflows first, add complexity gradually
Workflow Management
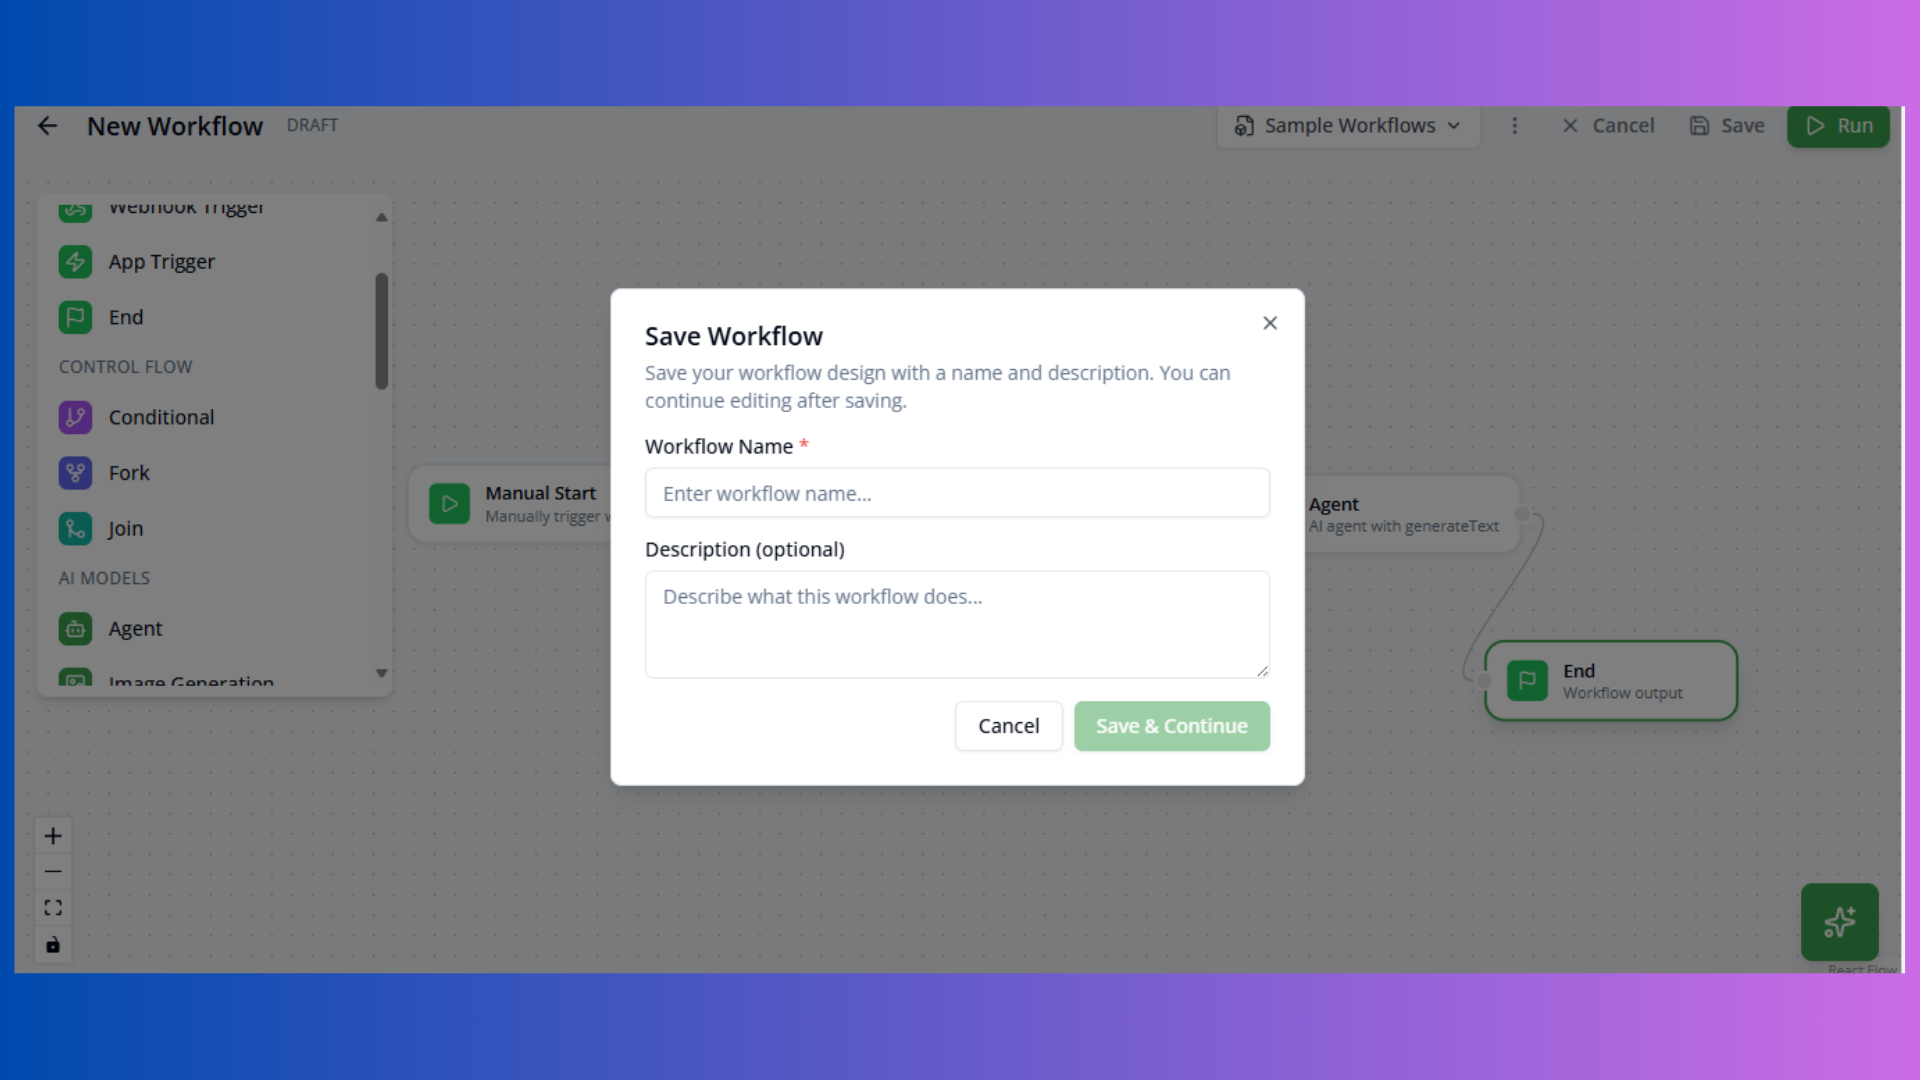
Saving Workflows
New Workflow:
- Click Save
- Enter workflow name and description
- Workflow created with status: DRAFT
Existing Workflow:
- Auto-saves on changes (debounced)
- Manual save via Save button
- Unsaved changes indicated by
*in title
Workflow Status
DRAFT: Development mode, not active ACTIVE: Enabled, triggers registered PAUSED: Temporarily disabled ARCHIVED: Deprecated, read-only
Activation
Requirements:
- Workflow must be saved
- Valid trigger node required
- All nodes properly configured
Activate: Click Activate button to enable triggers
Deactivate: Click Deactivate to pause execution
AI Workflow Assistant
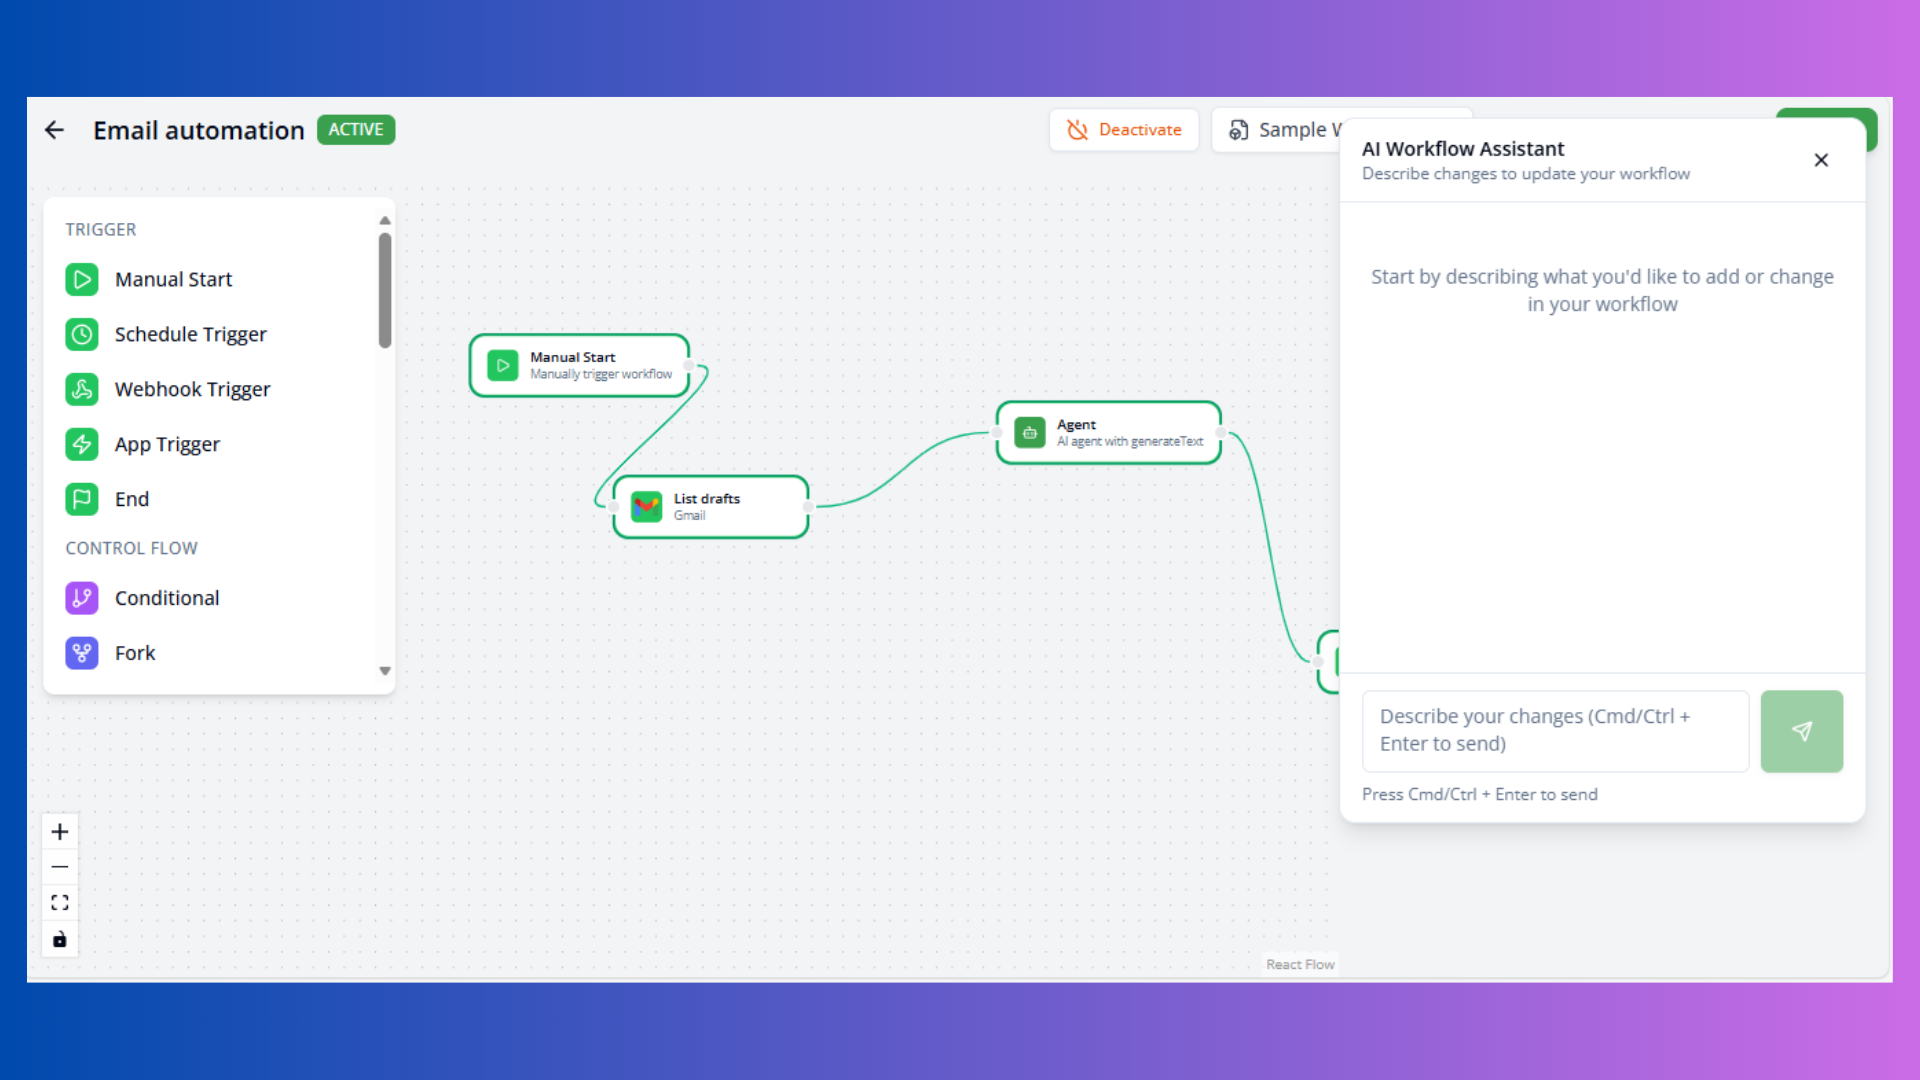
Access AI assistant via Sparkles button (bottom-right).
Capabilities:
- Generate complete workflows from description
- Add nodes to existing workflows
- Explain workflow logic
- Suggest improvements
- Debug issues
Example Prompts:
- “Create a daily report workflow”
- “Add error handling to this workflow”
- “How do I schedule this for weekdays only?”
Best Practices
Workflow Design:
- Start simple, add complexity incrementally
- Use descriptive node labels
- Test frequently during development
- Add comments using JavaScript nodes
Error Handling:
- Add conditional checks for error states
- Use try-catch in JavaScript/Python nodes
- Provide fallback paths
- Log errors for debugging
Performance:
- Minimize sequential steps
- Use parallel execution (Fork) where possible
- Optimize API calls
- Cache expensive operations
Maintainability:
- Document complex logic
- Use published agents for reusability
- Keep workflows focused on single purpose
- Version workflows before major changes
Sample Workflows
Load pre-built workflows via Sample Workflows dropdown:
- Daily email reports
- Data processing pipelines
- API integration examples
- Multi-step AI workflows
Customize samples to fit your needs.
Keyboard Shortcuts
- Tab: Navigate between nodes
- Delete: Remove selected node
- Cmd/Ctrl + C: Copy node
- Cmd/Ctrl + V: Paste node
- Cmd/Ctrl + Z: Undo
- Cmd/Ctrl + S: Save workflow
Next Steps
- Review Workflows Overview for management
- Explore AI Agents for agent creation
- Check Tasks for simple automations